Difference between revisions of "The King of Fighters 2002 UM/Goro Daimon"
| Line 256: | Line 256: | ||
* The Basic. <br />Starter, dp+C(whiff cancel), qcb+B, (dp+A, qcb+K or qcf+K)×N <br />(dp+A, qcb+K or qcf+K) is the loop. You can max it upto 4 times for each max mode duration. | * The Basic. <br />Starter, dp+C(whiff cancel), qcb+B, (dp+A, qcb+K or qcf+K)×N <br />(dp+A, qcb+K or qcf+K) is the loop. You can max it upto 4 times for each max mode duration. <br />Doing dp+C, qcb+B, dp+A as fast as you can after the mode activation is the key of the combo. We recommend you to practice with Maxima first to get the feeling of it. | ||
Revision as of 13:22, 5 December 2019
Movelist
Normals
Close
- cl.A/B/C/D are all cancel-able
- cl.A is chain-able into itself and into cr.A, cr. A & far B
- cl.B whiffs on crouching opponents
Stand
- only far B is cancel-able
- far. A is a good poke that can be used to stop incoming hops and it does not whiff on crouching opponents
- far B is a good poke that hits low and is cancel-able
- far C has the same vertical height has far A and be used to stop incoming hops in advance
- far D can be used as a poke to stop jump-ins and incoming hops. It whiffs on crouching opponents
Crouch
- cr. A, and cr. D are cancel-able
- cr. D can be whiff cancelled
- cr. B and cr. D hits low
- cr. B is chain-able from cl. A
- cr. B has a shorter horizontal range than st. B. while cr. D has a shorter range than cr.B
Jumping
- j.A is good for jumping in air-to-ground
- j.B can cross-up
- j.C swings downward at a short horizontal range & is good for air-to-ground
- j.D is good for jumping in air-to-ground and can instant overhead crouching opponents because of the deep downward hit-box
Blowback
- st. CD can be whiff cancel and has good horizontal range
- j. CD on hit causes a hard knockdown, and a counter wire on counter hit
Throws
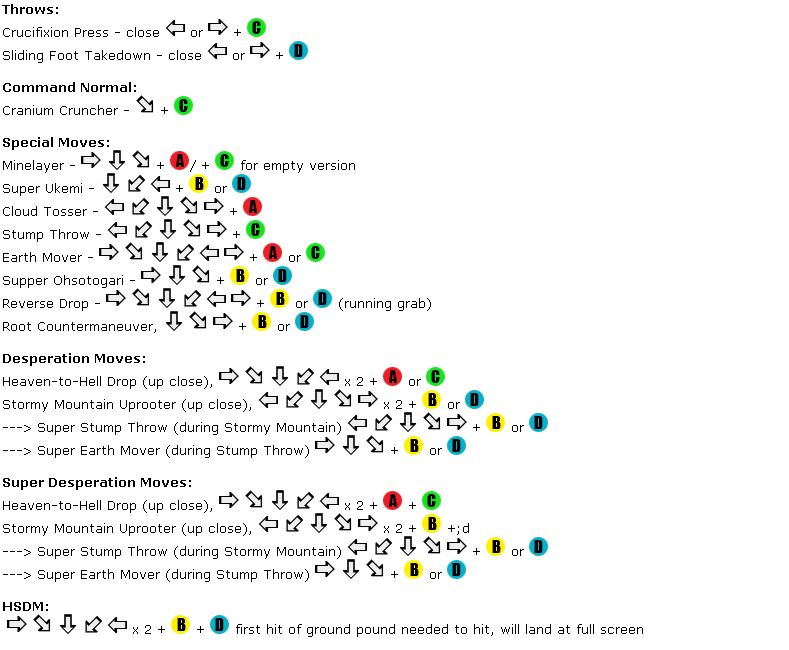
Crucifixion Press [Juuji Shime] - close, (b or f + C)
- Goro grabs the opponent and chokes them ground
- Can be mashed out of by the opponent to lessen damage
- Causes hard knockdown
- The opponent lands less than a half-screen distance away from Goro, and Goro recovers faster than the opponent wakes up
Sliding Foot Takedown [Okuri Kyaku Harai] - close, (b or f + D)
- Goro grabs and trips the opponent
- Causes a soft knockdown
- The opponent lands two character spaces away from Goro
Command Moves
Cranium Cruncher [Zujo Barai] - (df + C)
- Goro's forearm uppercut that can be used as an anti-air. Not as powerful and spacial as his 98 version though.
- Only super cancel-able
- Can combo from his light normals, and close D (heavy kick)
Special Moves
Minelayer [Jiraishin] - (dp + A/C)
- A button pounds the ground while C button is a feint
- Ground pound only hits standing opponents; can be evade if crouching
- Soft knockdown
Super Ukemi [Chou Ukemi] - qcb + B/D
- Goro's cancel-able command roll. Doesn't have any invincibility frames at any point during the duration of the move.
- Can be cancelled from Goro's cancel-able normals
- B (light kick) version travels shorter than the A+B roll, while D (heavy kick) travels a bit further.
Cloud Tosser [Kumo Tsukami] - (hcf + A)
- Goro's anti-air command throw. Can throw falling opponents from a counter wire wall bounce.
- In counter hit state during command throw animation
- The opponent lands near the corner of the screen
- Can be beaten out by active jumping normal attacks
- Hard knockdown
Stump Throw [Kirikabu Gaeshi] - hcf + C
- Goro snatches the opponent off the ground (standing or laying down), then slams them the opposite direction. The opponent lands close to the corner of the screen.
- Can be blocked; Goro gains a great amount of push-back away from the opponent
- Can only throw OTG (on the ground) opponents that have not tech rolled
- Hard knockdown
Supper Ohsotogari [Chou Oosotogari] - close, dp + B/D
- Goro grabs the opponent then leg-trips them
- This is a delayed command throw that has some invincibility while Goro's steps toward the opponent
- The opponent bounces on the ground 3 times, then lands near the corner of the screen
- Hard knockdown
Earth Mover [Tenchi Gaeshi] - close, hcb, f + A/C
- Goro grabs and slams the opponent, then tosses them in the air. Goro steps forward during the toss a few character spaces from his original position.
- The opponent lands half-screen away from Goro. Goro recovers faster than the opponent wakes up.
- Has a whiff animation
- 1 Frame command throw
- Hard knockdown
Root Countermaneuver [Nekko Gaeshi] - (qcf + B/D)
- After countering the opponent's attack, Goro grabs the opponent and over shoulder throws them
- The opponent lands a little under a half-screen distance away from Goro. Goro stands up and recovers before the opponent wakes up
- Can only counter standing mid attacks
- Hard knockdown
Reverse Drop [Ura Nage] - close, (hcb, f + B/D)
- Goro runs toward the opponent, slides behind them, then body slams them
- The opponent lands a 3/4th screen distance away from Goro, near the corner
- Goro recovers rather slow after slamming the opponent
- Goro is in a counter hit state while running towards the opponent
- Hard knockdown
Desperation Move
Heaven-to-Hell Drop [Jigoku Otoshi Gokuraku] - close, (hcb x 2 + A/C)
- This is the DM version of his hcb,f+P special move. Goro slams the opponent several times, to toss them towards the corner of the screen
- Can be cancelled from Goro's cancel-able normals
- Goro recovers almost around the same time the opponent wakes up
- 1 Frame command throw
- Hard knockdown
Stormy Mountain Uprooter - close, (hcf x 2 + B/D),
- ┗ Super Stump Throw during Stormy Mountain Uprooter (hcf + B/D)
- ┗ Super Earth Move during Super Stump Throw (dp + B/D)
- This is both an auto-guard move and a delayed command throw Desperation Move.
- The auto-guard comes first then the delayed command throw. Opponents moves that are too far away that are auto-guarded, won't be caught by Goro's throw. If no moves are auto-guarded, the delayed command throw will still release if the opponent is in range.
- The first section of this DM (Stormy Mountain Uprooter/hcfx2+BD) is his throw from the qcf+K counter that does 10% damage
- The second section (Super Stump Throw/hcf+K, Goro turns around after the first throw) is his hcf+P throw that does 12% damage. Goro recovers faster than the opponent wakes up which gives it the best okizeme opportunity.
- The final section (Super Earth Move/dp+K) is the body slam from his hcb,f+K throw that deals around 14% damage. Goro and the opponent recover around the same time after the knockdown.
- Hard knockdown
Super Desperation Moves
Jigoku Otoshi Gokuraku - close, (hcb x 2 + A+C)
- This is a much more stronger version of the normal DM that deals around 45% damage
- Hard knockdown
Nekko Meki - hcf x 2 + B+D (then, hcf + B/D, dp + B/D)
- This is a stronger version of the normal DM version that deals around 55% damage
- The last section (dp+K) is a combination of the animations of his hcbx2+P DM and his hcf+A anti-air throw
- Hard knockdown
HSDM
Hourinkazan - hcb x 2 + B+D
- Goro pounds the ground, then runs up behind the opponent to slam them, (like his hcb,f+K) then slams and ground pounds again (with Kanji flashing in the background) ending in a small explosion
- This is a HSDM version of Goro's dp+A ground pound special move that deals around 50% damage
- The opponent must be crouching to evade
- It can catch recovery rolling opponents if performed at the right time, and if they aren't crouching at the end of the roll
Discussion Threads
Discuss at Dream Cancel
Discuss at ON
Combos
0 Stock
- - cr.B, hcb f+P
- - cl.A, st.B, hcb f+P
- - st.D, df+C
- - (against standing opponent) cr. D, qcb+B, dp+A
- - df.C, hcf+A
- - j.CD, hcf+C
- - (against standing opponent) j.CD(counter), st.CD, qcb+B, (cancel)dp+A
- - j.CD(counter), df.C, hcf+A
1 Stock
- - cr.A, df+C, hcbx2+P
3 Stock
- - st.D, (BC run) st.C, df+C, hcbx2+AC
Ground Pound Combo (advanced)
Daimon's dp+A, the Ground Pound, is unblockable move against standing opponent. It also does OTG if you cancel into it from other move such as qcb+k.
And you may have seen there are 2 sample involves the ground pound in 0 stock combos.
This move is suitable for extended combo, which is one of the most efficient combos in the game. (1 stock 60%, 2 stock 80%, 3 stock ToD)
So this section will talk about this very specific combo.
But before we start it there are several information you need to know.
This combo is one of the most situational combo. And there are so many restrictions around this combo. Thus we recommend you to memorize most of them if possible.
- The first and the biggest restriction this combo has is
You can't use this combo if your opponent were crouched before the knockdown
- Kof has a legacy system, which keeps one's status before their knock down, whether standing or crouching.
- So crouched player will be considered as crouched till they stand up, and any knock down won't change it.
- By following this system your ground pound combo never going to work if they were crouched. Since it makes them keep crouching until full wake up.
- Them doing quick rise after ground pound will mess the timing of your combo. you have to do it faster if they did. Wrong timing makes it not working.
- for example, no quick rise / early ground pound. This will drop.
- will talk about the detail later, but the quick rise also affects your combo route.
- The Basic.
Starter, dp+C(whiff cancel), qcb+B, (dp+A, qcb+K or qcf+K)×N
(dp+A, qcb+K or qcf+K) is the loop. You can max it upto 4 times for each max mode duration.
Doing dp+C, qcb+B, dp+A as fast as you can after the mode activation is the key of the combo. We recommend you to practice with Maxima first to get the feeling of it.
- Starter
In Kof 2002UM, each characters have different wake up frame. This will affect your combo route include starter and such.
Universal combo route : j.CD counter raw Max mode activation start up, SC hcfx2.K double loop, st.CD or cr.D Max mode activation(if they failed quick rise), df.C BC j.CD
(-13F) - Ralf, Yuri
(-11F) - Athena
(-9F) - Whip
(-7F) - Yamazaki, Kula
Double loop without SC works below.
(-6F) - Joe, Robert, Angel, Kasumi
(-5F) - Kim, B. Mary, Hinako, Mature, Ryo, Foxy, Mai
(-3F) - K', Takuma
j.CD counter raw Max hcf+A works below.
(-2F) - Yashiro, Lin
hcb,f+P raw Max works below.
(-1F) - Daimon, Terry, Kensou, Clark, May Lee, Vanessa
(0F) - Kyo, Chang, Choi, Vice, Shingo, King, KUSANAGI, Kyo-1, Kyo-2, Nameless
hop.CD raw Max works below.
(+2F) - Leona, Iori
(+3F) - Chris, Heidern, Chin
(+4F) - Andy, Bao, Xiangfei
(+5F) - Billy, Shermie
(+6F) - Benimaru, Ramon, Jhun
(+10F) - Maxima
Videos
Goro Master Class


