Difference between revisions of "Samurai Shodown IV/Haohmaru"
(→Kicks) |
|||
| Line 324: | Line 324: | ||
|name=j.A | |name=j.A | ||
|data= {{AttackData-SSIV | |data= {{AttackData-SSIV | ||
|damage=8 | |damage=8(9) | ||
|startup=- | |startup=- | ||
|active=- | |active=- | ||
| Line 335: | Line 335: | ||
|juggle= No | |juggle= No | ||
|unarmed= No | |unarmed= No | ||
|description= Jumping version of f.5A. | |description= Jumping version of f.5A. Makes for a good air-to-air. | ||
}} | |||
}} | |||
{{MoveData | |||
|name=j.B | |||
|data= {{AttackData-SSIV | |||
|damage=17(20) | |||
|startup= | |||
|active= | |||
|recovery= | |||
|hitAdv= | |||
|blockAdv= | |||
|deflect=No | |||
|guard=High | |||
|cancel=Landing | |||
|juggle=No | |||
|unarmed=No | |||
|description=A slower version of j.A that does more damage. | |||
}} | |||
}} | |||
{{MoveData | |||
|name=j.C | |||
|data= {{AttackData-SSIV | |||
|damage=25(29) | |||
|startup= | |||
|active= | |||
|recovery= | |||
|hitAdv= | |||
|blockAdv= | |||
|deflect=No | |||
|guard=High | |||
|cancel=Landing | |||
|juggle=No | |||
|unarmed=No | |||
|description=An airborne downward swing. Makes for a decent air-to-air, but it has less range than j.A and j.B. | |||
}} | |||
}} | |||
{{MoveData | |||
|name=j.D | |||
|data= {{AttackData-SSIV | |||
|damage=8(9) | |||
|startup= | |||
|active= | |||
|recovery= | |||
|hitAdv= | |||
|blockAdv= | |||
|deflect=No | |||
|guard=High | |||
|cancel=Landing | |||
|juggle=No | |||
|unarmed=Yes | |||
|description=A jumping Kick that has less range than j.A and j.B. | |||
}} | }} | ||
}} | }} | ||
Revision as of 05:51, 28 May 2023
WIP
Overview
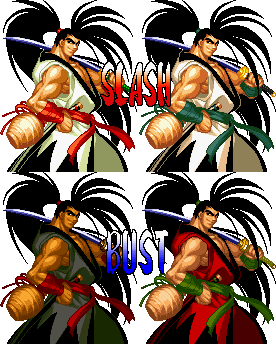
Haohmaru, the drunk and lovable protagonist of the series is back, and he’s coming back swinging. While both Techniques lost some of their stronger gimmicks in the shift from SS3 to SS4, Haohmaru is still both an honest midrange character and also a complete and total gorilla.
Slash
Slash, sadly, lost almost everything that gave him an identity apart from Bust in SamSho 4. He lost his air specials and Zankousen from SamSho 3, and gained hardly anything new to make up for it. This means his gameplay is basic Haohmaru stuff with relatively little spice. He’s got everything he needs to succeed, and is absolutely one of the stronger characters, but Bust has all of that combined with way better offensive AND defensive presence.
Bust
Bust’s moveset is kept mostly intact, with nerfs across the board. He’s not going to be turning fireballs into infinites this time, but his tools and combos remain some of the most potent in the entire game. In spite of the toning down Gou Ha received, it still manages to open up an infinite that can be done regardless of screen position. Even if he didn’t have everything better by default in this Technique, Gou Ha alone would still render Bust the superior pick.
Normals
Far Slashes
| f.5A |
|---|
| f.5B |
|---|
| f.5C |
|---|
| f.2A |
|---|
| f.2B |
|---|
| f.2C |
|---|
Close Slashes
| c.5A |
|---|
| c.5B |
|---|
| c.5C |
|---|
| c.2A |
|---|
| c.2B |
|---|
| c.2C |
|---|
Kicks
| 5D |
|---|
| 6D |
|---|
| 2D |
|---|
| 3D |
|---|
Jumping Normals
| j.A |
|---|
| j.B |
|---|
| j.C |
|---|
| j.D |
|---|
Special Moves
Both
-Senpu Retsuzan - 236S
- Description - Senpu Retsuzan is your standard fireball, with each slash button determining how far it flies and increasing recovery. You can follow up on it with a heavy pursuit, leading to fair damage for a low risk fireball.
It's also worth noting that the Bust Version puts you in a juggle state, unlike the Slash version. This allows Bust Haohmaru to combo into his 623S, j.C, or WFT.
-Kogetsu Zan - 623S (Rage Special)
- Description - Kogetsu Zan is your DP, and a fine one at that. Effective as an anti-air, reversal, and your main combo tool.
When raged, it does more hits+damage and allows you to land a heavy pursuit if they’re near the corner.
-Shippu Kogetsu Zan - 623S While Running
- Description - This is an alternate version of Kogetsu Zan that moves forward during the attack and inflicts a longer knockdown. The light version is the best of the bunch, as it nets you a free heavy pursuit afterwards.
Slash Only
-Resshin Zan - 421S
- Description - Resshin Zan is a gimmicky overhead special. All versions startup fast and knock down, with each slash button determining how far Haohmaru leaps. Spacing this so only the tip hits on block makes it somewhat safe.
-Tenha Fujinzan - 4632AB (WFT)
- Description - Tenha Fujinzan is a slightly below average WFT. Deals alright damage, and can be used as a reversal thanks to invincibility and quick startup. Due to not catching on hit, it doesn’t properly juggle airborne opponents and can be exploded out of, leaving Haohmaru with empty POW.
