Difference between revisions of "The King of Fighters XIII/Robert Garcia"
| Line 2: | Line 2: | ||
| __TOC__ | | __TOC__ | ||
|} | |} | ||
[[Image: | [[Image:Robertxiii.jpg]][[Image:spacer.gif]][[Image:Robert_sprite.gif]] | ||
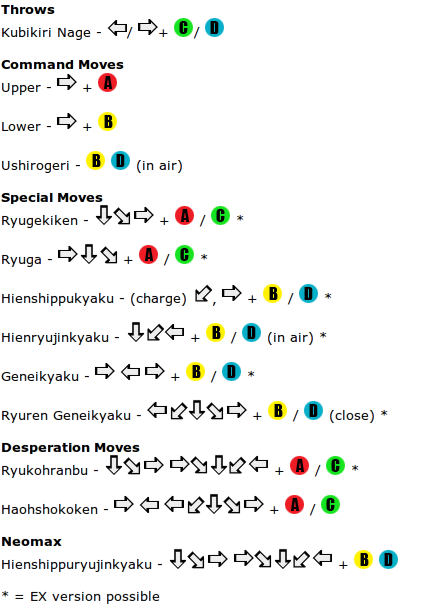
[[Image:Robertxiiimoves.png]] | [[Image:Robertxiiimoves.png]] | ||
Revision as of 15:17, 21 December 2011
Console Changes
- (stand CD has faster startup
- You can’t roll recover after being hit by his NEOMAX
- LK Hien Shippuu Kyaku {charge db~f+B} has faster startup, such that it can be comboed from light attacks.
- his f+A floats the opponent upwards if done by itself
- EX Genei Kyaku has less lag afterwards. In the corner you can follow up afterwards without using a drive stock.
- EX Ryuuko Ranbu has more lag after being blocked.
- (EX Ryuuko Ranbu has had the damage for each of its hits adjusted. The entire move does the same damage, but its damage in combos has been buffed. The finishing hit now does 100 damage by itself.
- Haoh Shoukou Ken has faster startup and will combo from strong attacks.
Producer Yamamoto says: "There’s no invincibility on Robert’s f+LP {f.A}, but when trading with a jump attack, it’s still possible to juggle afterwards. It’s a one command move, so good to keep in mind as an anti-air option. Not only can weak hien-shippukyaku combo from weak attacks, Ryugekiken is useful against opponents who roll forward."
Normals
Standing
s. A 25 damage, whiff/chain/cancel-able, hits mid. A shoulder height quick jab. Almost neutral on block, and good for stopping hops and close range poking.
s. B 30 damage, whiff/cancel-able, hits mid. A fairly high sidekick that is great for stopping hops, and sloppy jumpouts from opponents trying to escape the corner. A good quick jump checker, and safe on block.
far C 80 damage, whiff/cancel-able, hits mid. A strong hook that can whiff canceled. Has a fairly good range, and can be used a poke within mid-close range.
far D 70 damage, hits mid. A high angled kick that sometimes may be activated into his s. D when fairly close to the opponent. It can be used to stop a few close high jumps but its attacking area seems to be fairly small...
s. C 70 damage, cancel-able, hits mid. A quick and safe (on block) punch to the gut. This punch will be used in many of his combos.
s. D 60+47 damage, cancel-able, hits mid. A double axe kick that has a fairly high height. Good for stopping those trying to jump above your head blindly.
Crouching
d. A: 25 damage, whiff/chain/cancel-able, hits mid. Swift low jab with good range. Neutral almost on block, and its a good crouching normal to use to maintain space.
d. B: 30 damage, chain-able, hits low. Fast low light kick with good range and great starter for combos starting with a low attack.
d. C: 70 damage, cancel-able, hits mid. An uppercut that is good for stopping those trying to jump over you while they are in close range, and jumps from mid range.
d. D: 80 damage, whiff/cancel-able, hits low. His patented sweep from past games which still seems to cover a good distance. You can whiff cancel this kick, so be sure to do that if you're gonna be swinging it around as a poke.
Jumping
j. A: 45(40) damage, cancel-able, hits overhead. A downward angled punch that is good for jumpins.
j. B: 45(40) damage, hits overhead. A fairly deep jump kick that has a long range and good downward angle. Good for cross-ups too.
j. C: 72(70) damage, cancel-able, hits overhead. This j.c has a more steeper angle facing down than past games, so it seems best to use it for deep jumpins.
j. D: 70(68) damage, overhead. Almost the same as his past games j. D, nice range, hits deep, can cross-up, and is great for jumpins.
Blowback Attack
CD: 75 damage, whiff/cancel-able, hits mid. This kick has some great range, and hes steps forward too, so you can almost kara-cancel it to a few of his special moves.
j. CD: 90(80) damage, cancel-able, hits mid. Great air-to-air like his past games j. CD. Covers a good range and has good priority. Just be careful when using it a lot because it will miss on some crouching characters.
GCCD 10 damage, hits mid.
Throw
Kubikiri Nage = (b/f+C/D) close 100 damage, cause a hard knockdown. Robert just dumps them on the ground like yesterdays garbage, which can be followed up by a cross-up or you can bait a roll or special move on their wake-up, etc.
Command Moves
Upper = (f+A) 22+21 damage when canceled into, 60 damage by itself. Cancel-able, hits mid.
- When canceled into from another normal, the first hit is cancel-able. By itself it launches the enemy HIGH into the air, just above the characters lifebars. If its a counter hit and they are jumping or superjumping, they will be knocked WAYYY high in the air. With this you can hit them with any special move, or DM that is fast enough to hit them while they are descending. You can also use his for some cool reset setups either mid screen or in the corner. The drawback to this move is that its start-up is fairly slow, and it doesn't have any invincibility, so using it as an anti-air option can be a little risky.
Low Kick = (f+B) 45 damage, cancel-able, hits low.
- One great thing about this kick is that it doesn't lose its low hit property when canceled from another normal. Plus, you can cancel it on hit. You can only whiff cancel it into his f+A it seems. By itself on block it is a little unsafe, so be sure to cancel it into a qcf+P incase it gets punished by a fast normal, special move or 1f command throw (especially on hit). Overall, it is a good move to be used in the middle of its combos but use caution when using it alone.
Ushirogeri = (B+D) in air 55 damage, hits mid.
- This move would be very annoying it was an overhead. It's tricky as is, and its great cross-up tool. Depending on your spacing, it may miss some crouching opponents.
Triangle Jump (Ushirogeri) = (B+D) near wall
- Robert bounces off the wall (edge of screen) for a possible air attack follow up. Doing this in the corner is risky because its an open invitation for an anti-air.
Special Moves
Ryugekiken = (qcf+P)
(EX) = qcf+AC
- Super-Cancellable
- Hit Detection: High
- Damage: 65; EX Damage: 60, 70
Ryuga = (dp+P)
(EX) = dp+AC
- Drive- / Super-Cancellable
- Hit Detection: High
- A Damage: 70 (45); C Damage: 75, 45; EX Damage: 100, 70
Hienshippukyaku = (db~f+K)
(EX) = db~f+BD
- Drive-Cancellable (D version only)
- Hit Detection: High
- B Damage: 70; D Damage: 60 x 2; EX Damage: 70, 80
Hienryujinkyaku = (qcb+K) in air
(EX) = qcb+BD in air
- Drive-Cancellable
- Hit Detection: High
- Damage: 60; EX Damage: 120
Geneikyaku = (f,b,f+K)
(EX) = f,b,f+BD
- Drive- / Super-Cancellable
- Hit Detection: High
- Damage: 0 x 2, 10 x 13, 135; EX Damage: 0 x 2, 15 x 19, 155
Ryuren Geneikyaku = (hcf+K)
(EX) = hcf+BD
- Can't be cancelled
- Hit Detection: Throw
- Damage: 10 x 3, 130; EX Damage: 10 x 6, 80
Desperation Moves
Ryukohranbu = (qcf hcb+P)
(EX) = qcf hcb+AC
- MAX Cancellable
- Hit Detection: High
- Damage: 0, 10 x 13, 30, 60; EX Damage: 0, 10 x 10, 8 x 18, 10, 50
Haohshokoken = (f,hcf+P)
- Hit Detection: High
- Damage: 200
Neomax
Hienshippuryujinkyaku = (qcb hcf+BD) also in air
- Hit Detection: High
- Damage: 0 x n, 450 (125)
Combos
No Stock, No Drive Gauge -
j. D, st. C, f+B, f+A, dp+C
j. D, st. C, f+B, f+A, db~f+K
st. C, f+B, hcf+K
st. C, f+B, dp+C
cr. B x2, f+B, dp+C
cr. B x2, f+B, hcf+K
No Stock, 1+ Drive Gauge -
- j. D, st. C, f+B, f+A, dp+C, (DC) qcf+P
- j. D, st. C, f+B, f+A, dp+C, (DC) f b f+K
- st. C, f+B, hcf+BD, f b f+K, (DC) dp+P
- cr. Bx2, f+B, qcf hcb+P
1 Stock, No Drive Gauge -
cr. Bx2, f+B, qcf hcb+P
1 Stock, 1+ Drive Gauge -
j. D, st. C, f+B, f+A, dp+C, (DC) qcf hcb+P
3 Stock, 1+ Drive Gauge -
st. C, f+B, hcf+BD, f b f+K, (SC) qcf hcb+P
HD Combos
(1) st. C, f+B, f+A [HD], st. C, f+B, qcf hcb+BD
(2) st. C, f+B, f+A [HD] st. C, f+B, f+A, hcf+BD, f b f + BD (HDC) qcf hcb+BD
(3) j. D, st. C, f+B, f+A [HD] st. C, f+B, f+A, dp+C (DC) qcb+D in air, dp+C (DC) f b f + BD (HDC) qcf hcb+P (MC) qcf hcb+BD
Links & References
Technical Reference
http://www.youtube.com/watch?v=C299OL3EB8k
Combo Video by Mr. KOF
http://www.youtube.com/watch?v=abPgB9ZAzIU
Discussion Threads
Discuss at Dream Cancel


