Difference between revisions of "The King of Fighters XIII/Ryo Sakazaki"
(Setting up the Quick Combos Section and format for Ryo) |
|||
| Line 3: | Line 3: | ||
|} | |} | ||
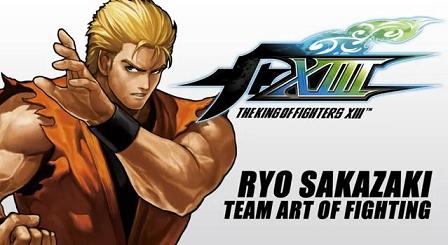
[[Image:Ryoxiii.jpg]][[Image:Spacer.gif]][[Image:Ryo_sprite.gif]] | [[Image:Ryoxiii.jpg]][[Image:Spacer.gif]][[Image:Ryo_sprite.gif]] | ||
{| border="1" align="right" style="font-size:90%" | |||
|+ | |||
== Quick Combo Reference == | |||
|- | |||
| '''0 Stock, No Drive Gauge''' | |||
| | |||
Low<br/> | |||
Anywhere<br/> | |||
Corner<br/> | |||
| | |||
c.B, c.A, hcb+B = 131 dmg<br/> | |||
j.D, s.D, hcb+D = 262 dmg<br/> | |||
j.D, s.D, f,b,f+C, qcf+A, f,b,f+A = 298 dmg<br/> | |||
|- | |||
| '''1 Stock, No Drive Gauge''' | |||
|Anywhere | |||
|j.D, s.D, f.A, qcf,hcb+P = 365 dmg | |||
|- | |||
| '''0 Stock, 1+ Drive Gauge''' | |||
|Corner | |||
|j.D, s.D, qcf+A, dp+C (DC), hcb+D, dp+C = 437 dmg | |||
|- | |||
| '''3 Stock, 2 Drive Gauge''' | |||
|Anywhere | |||
|j.D, s.D, f.A, qcfx2+AC = 602 dmg | |||
|- | |||
|} | |||
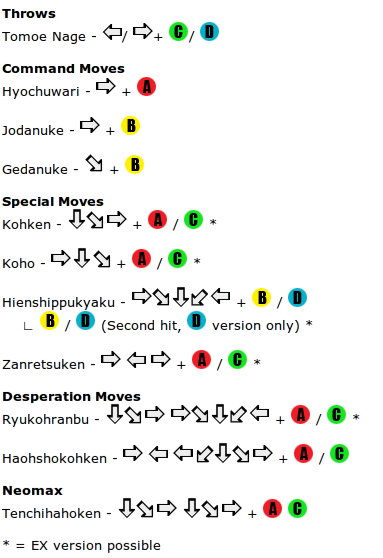
[[Image:Ryoxiiimoves.png]] | [[Image:Ryoxiiimoves.png]] | ||
Revision as of 05:29, 23 January 2012
| 0 Stock, No Drive Gauge |
Low |
c.B, c.A, hcb+B = 131 dmg |
| 1 Stock, No Drive Gauge | Anywhere | j.D, s.D, f.A, qcf,hcb+P = 365 dmg |
| 0 Stock, 1+ Drive Gauge | Corner | j.D, s.D, qcf+A, dp+C (DC), hcb+D, dp+C = 437 dmg |
| 3 Stock, 2 Drive Gauge | Anywhere | j.D, s.D, f.A, qcfx2+AC = 602 dmg |
Normals
Standing
s.A 25 damage, chain/cancel-able, hits mid. A safe and neutral positioning jab, that is good for stopping hops.
s.B 30 damage, cancel-able, hits mid. A safe and quick front kick that is far range and cancel-able.
far C 80 damage, whiff/cancel-able, hits mid. Nice ranged hook that has good damage.
s.D 70 damage, whiff/cancel-able, hits mid. Looks like a low kick, but it hits mid.
s.C 70 damage, cancel-able, hits mid. A safe, quick uppercut to the chin. Ideal for close quarters because it is more safe on block than his s.D.
Crouching
d.A 25 damage, chain/cancel-able, hits mid. Same as his standing A, but crouching. Good pressure when in close range.
d.B 30 damage, chain-able, hits low. Great low poke, a good starter for his combos, and is safe on block.
d.C 70 damage, cancel-able, hits mid. Good for stopping jump-ins.
d.D 80 damage, cancel-able, hits low. A wide ranged sweep that is cancel-able which makes it very safe to poke around with.
Jumping
j. A: 45 (40) damage, hits overhead.
j. B: 45 (40) damage, hits overhead.
j. C: 72 (70) damage, hits overhead.
j. D: 79 (68) damage, hits overhead.
Blowback Attack
CD
- Hit Detection: High
- Damage: 75
j. CD
- Hit Detection: High
- Damage: 90 (80)
GC CD
- Hit Detection: High
- Damage: 10
Throw
Tomoe Nage = (b/f+C/D)
- Can be broken
- Hit Detection: Throw
- Damage: 100
Command Moves
Hyochuwari = (f+A)
- Super-cancellable only
- Hit Detection: Mid (High if cancelled into)
- Damage: 70 (65)
Jodanuke = (f+B)
- Cancellable
- Counters high attacks
- No damage
Gedanuke = (df+B)
- Cancellable
- Counters low attacks
- No damage
Special Moves
Kohken = (qcf+P)
(EX) = qcf+AC
- Super cancellable
- Hit Detection: High
- A Damage: 55; C Damage: 70, EX Damage: 120
Koho = (dp+P)
(EX) = dp+AC
- Drive- / Super cancellable (first hit)
- Hit Detection: High
- A Damage: 63 (35); C Damage: 75, 50; EX Damage: 160 (100)
Hienshippukyaku = (hcb+K)
(EX) = hcb+BD
- Hit Detection: High
- B Damage: 40, 50; D Damage: 40, 50, 60; EX Damage: 80 x 2
Zanretsuken = (f,b,f+P)
(EX) = f,b,f+AC
- Drive- / Super cancellable
- Hit Detection: High
- A Damage: 0, 12 x 11, 80; C Damage: 0, 12x11, 50; EX Damage: 0, 15 x 19, 90
Desperation Moves
Ryukohranbu = (qcf hcb+P)
(EX) = qcf hcb+AC
- Max Cancellable
- Hit Detection: High
- Damage: 0, 5 x 2, 10 x 4, 5, 10 x 2, 5, 10, 5, 115; EX Damage: 0, 10 x 2, 15 x 2, 10, 15 x 4, 10, 15 x 4, 30, 40, 100
Haohshokohken = (f,hcf+P)
- Hit Detection: High
- Damage: 200
Neomax
Tenchihahoken = (qcfx2+AC)
- Hit Detection: High
- Damage: 480
Combos
No Stock or Drive Gauge -
cr.Bx2, cr.A, hcb+B
cr.B, cr.C, special attack
cl.C, hcb+D (standing opponents only)
cr. B, cr. A, f b f+A
0 Stock, 1+ Drive Gauge -
j.C, cr.C, qcf+A, dp+C (1)(DC), hcb+D, dp+C = 439 dmg
1 Stock, No Drive Gauge -
cr.Bx2, cr.A, qcf+AC
st.C, f+A, qcf hcb+P
cl.C, hcb + BD, f b f+A
1 Stock, 1 Drive Gauge -
j.C, cr.B, cr.C, hcb+BD, dp+C(1)(DC), hcb+D, dp+C
2 Stock, No Drive Gauge -
cr. B, cr. A, qcf hcb+AC
3 Stock, No Drive Gauge
cl.C, hcb + BD, qcf hcb+AC
HD Combos
No Stock, 100% Drive -
(1)(corner) cl.C -> f+A -> HD -> D -> qcf+A -> dp+C -> DC qcf+A -> [dp+C -> DC qcf+A -> qcf+A]x3 -> finisher
1 Stock, 100% Drive -
(2)[HD] dp+AC, (HDC) qcf+Ax2, dp+C, (HDC) qcf+Ax2, dp+C, (HDC) qcf+A, dp+C, (HDC) qcf+Ax2, dp+C, (HDC) qcf+Ax2, f b f+A
(3)[HD] qcf+A, dp+C, (HDC) qcf+A, dp+C, (HDC) qcf+Ax2, dp+C, (HDC) qcf+Ax2, dp+C, (HDC) qcfx2+A, dp+C, (HDC) qcf+A, qcf hcb+P
2 Stock, 100% Drive -
(4)[HD] dp+AC, (HDC) qcf+Ax2, dp+C, (HDC) qcf+Ax2, dp+C, (HDC) qcf+Ax2, dp+C, (HDC) qcf+Ax2, dp+C, (HDC) qcf hcb+P
(5)[HD] qcf+A, dp+C, (HDC) qcf+A, dp+C, (HDC) qcf+Ax2, dp+C, (HDC) qcf+Ax2, dp+C, (HDC) qcf+Ax2, dp+C, (HDC) qcf+Ax2, qcf hcb+AC
(6)[HD] qcf+A, dp+C, (HDC) qcf+A, dp+C, (HDC) qcf+Ax2, dp+C, (HDC) qcf+Ax2, dp+C, (HDC) qcf+Ax2, dp+C, (HC) qcfx2+AC
3 Stock, 100% Drive -
(7)[HD] f+A, hcb+BD, dp+C, (HDC) hcb+D, dp+C, (HDC) hcb+D, dp+C, (HDC) f b f+AC, dp+C, (HDC) qcf+Ax2, qcf hcb+P
(8)[HD] qcf+A, dp+C, (HDC) qcf+A, dp+C, (HDC) qcf+Ax2, dp+C, (HDC) qcf+Ax2, dp+C, (HDC) qcf+Ax2, dp+C, (HC) qcfx2+AC
4 Stock, 100% Drive -
(9)[HD] f+A, hcb+BD, dp+C, (HDC) hcb+D, dp+C, (HDC) hcb+D, dp+C, (HDC) f b f+AC, dp+C, (HDC) qcf+Ax2, qcf hcb+AC
(10)[HD] dp+AC, (HDC) qcf+Ax2, dp+C, (HDC) qcf+Ax2, dp+C, (HDC) qcf+Ax2, qcf hcb+P, (MC) qcfx2+AC
Tips
One of Ryo's most effective weapons is his Kohken. This move sets up a good deal of offense and is a great defensive tool.
Though Ryo's fireball is not a fullscreen forward progressing projectile, this is in no way a weakness. When using Ryo, consider his projectile to be a shell that expands and contracts accordingly to the right situations, and Fireball A/C/EX versions maintain it.
The facts are:
1. The fireball itself has a much larger hit box than it appears, especially when using the A version, which looks deceptively small, often catching as an anti-air.
2. The fireball knocks down on any version, which is huge in resetting your position or transitioning into rushdown.
3. Blockstun and recovery on the A version is really good, especially in the corner to setup mix-up situations. Blockstun on C version is also great long distance, but can be punished with a fast move if done at close range. However, if you whiff C version Kohken, it can be punished even from long distance from plenty of characters (K' comes to mind), and this is the version people are hoping to jump over or roll through to punish for a fat combo.
4. EX version comes out really fast and has invincibility, and you recover before they do, so use this move to throw the opponent off from reading patterns since it's not expected. Also, a good and safe option to use to get out of K's fireball traps in the corner.
Now with all these uses for the fireballs it sets up everything from being easier to predict when to parry, mix in uppercuts, set up jumps for anti-airs, or super, EX super.
He also has a very effective fireball trap in the corner with A, EX version, and even C version with particular spacing to bait the opponent to stick something out, then follow up with a parry or uppercut.
The downside though is that against maybe one particular character (Chin!!) the fireball game becomes a dangerous game to play due to his (Chin's) low to the ground size. His moves make him invulnerable to the fireballs since majority of the hit box is lower middle to high and makes it really easy for Chin to penetrate Ryo's defense.
Links & References
Technical Reference
http://www.youtube.com/watch?v=jk6pULuOck8
Discussion Threads
Discuss at Dream Cancel


