Difference between revisions of "XV Broken/Kukri"
Jump to navigation
Jump to search
m (→Normals) |
|||
| Line 55: | Line 55: | ||
===Far Standing Normals=== | ===Far Standing Normals=== | ||
====Far A==== | |||
{{MoveData | {{MoveData | ||
|image= | |image= | ||
| Line 76: | Line 77: | ||
}} | }} | ||
====Far B==== | |||
{{MoveData | {{MoveData | ||
|image= | |image= | ||
| Line 98: | Line 99: | ||
}} | }} | ||
====Far C==== | |||
{{MoveData | {{MoveData | ||
|image= | |image= | ||
| Line 120: | Line 121: | ||
}} | }} | ||
====Far D==== | |||
{{MoveData | {{MoveData | ||
|image= | |image= | ||
| Line 146: | Line 147: | ||
===Close Standing Normals=== | ===Close Standing Normals=== | ||
====Close A==== | |||
{{MoveData | {{MoveData | ||
|image= | |image= | ||
| Line 167: | Line 169: | ||
}} | }} | ||
====Close B==== | |||
{{MoveData | {{MoveData | ||
|image= | |image= | ||
| Line 189: | Line 191: | ||
}} | }} | ||
====Close C==== | |||
{{MoveData | {{MoveData | ||
|image= | |image= | ||
| Line 211: | Line 213: | ||
}} | }} | ||
====Close D==== | |||
{{MoveData | {{MoveData | ||
|image= | |image= | ||
| Line 235: | Line 237: | ||
===Crouch Normals=== | ===Crouch Normals=== | ||
====Crouch A==== | |||
{{MoveData | {{MoveData | ||
|image= | |image= | ||
| Line 256: | Line 259: | ||
}} | }} | ||
====Crouch B==== | |||
{{MoveData | {{MoveData | ||
|image= | |image= | ||
| Line 278: | Line 281: | ||
}} | }} | ||
====Crouch C==== | |||
{{MoveData | {{MoveData | ||
|image= | |image= | ||
| Line 300: | Line 303: | ||
}} | }} | ||
====Crouch D==== | |||
{{MoveData | {{MoveData | ||
|image= | |image= | ||
| Line 324: | Line 327: | ||
===Jump Normals=== | ===Jump Normals=== | ||
====Jump A==== | |||
{{MoveData | {{MoveData | ||
|image= | |image= | ||
| Line 345: | Line 349: | ||
}} | }} | ||
====Jump B==== | |||
{{MoveData | {{MoveData | ||
|image= | |image= | ||
| Line 367: | Line 371: | ||
}} | }} | ||
====Jump C==== | |||
{{MoveData | {{MoveData | ||
|image= | |image= | ||
| Line 389: | Line 393: | ||
}} | }} | ||
====Jump D==== | |||
{{MoveData | {{MoveData | ||
|image= | |image= | ||
| Line 407: | Line 411: | ||
|description= * Enter move description here. | |description= * Enter move description here. | ||
* | * | ||
* | * | ||
}} | }} | ||
Revision as of 14:57, 14 February 2022
Introduction
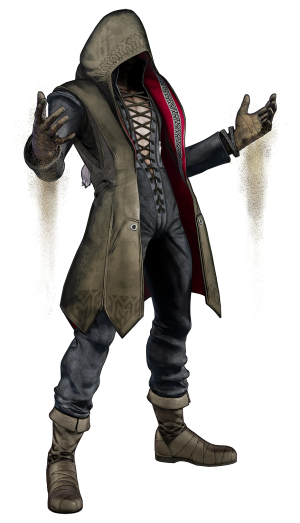
Always scheming between the cracks of society, Kukri can bury anyone who challenges him with his sand-based techniques. His true visage is unknown as his hood constantly blocks his face.
He wrangles both Ash and Elisabeth into joining him in this KOF in order to fulfill his plan.
Movelist
Throws
Command Normals
Special Moves
Super Special Moves
Quick Combo Reference
| 0 Meter |
Placeholder |
( = dmg |
| 1 Meter |
Placeholder |
( = dmg |
| 2 Meters |
Placeholder |
( = dmg |
Gameplay Overview
Normals
Far Standing Normals
Far A
| Far A |
|---|
Far B
| Far B |
|---|
Far C
| Far C |
|---|
Far D
| Far D |
|---|
Close Standing Normals
Close A
| Close A |
|---|
Close B
| Close B |
|---|
Close C
| Close C |
|---|
Close D
| Close D |
|---|
Crouch Normals
Crouch A
| Crouch A |
|---|
Crouch B
| Crouch B |
|---|
Crouch C
| Crouch C |
|---|
Crouch D
| Crouch D |
|---|
Jump Normals
Jump A
| Jump A |
|---|
Jump B
| Jump B |
|---|
Jump C
| Jump C |
|---|
Jump D
| Jump D |
|---|
Blowback
| Stand CD |
|---|
| Jump CD |
|---|
| Hop CD |
|---|


