Difference between revisions of "The King of Fighters XIII/Hwa Jai"
(→Combos) |
(→Combos) |
||
| Line 235: | Line 235: | ||
j.D, st.C, df.B, qcf hcb+A | j.D, st.C, df.B, qcf hcb+A | ||
j.CD, dp+BD - 235 damage | j.CD, dp+BD, f+D, f+D - 235 damage | ||
* does not require counter-hit | * does not require counter-hit | ||
Revision as of 06:41, 22 March 2012
| 0 Stock, No Drive Gauge |
Low |
cr.B, cr.B, st.B, df.B, dp+D = 227 dmg |
Gameplay Overview
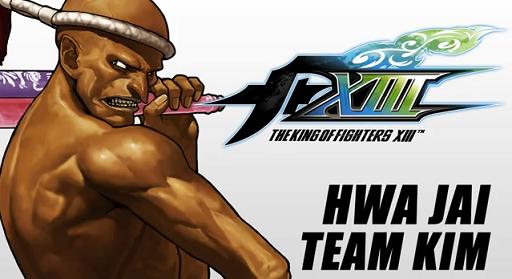
Hwa Jai is an extremely offensively oriented character. If played properly he should cause opponents to be constantly alert and afraid, since he has a tool to punish every single option in the game. Essentially Hwa is one of the scariest characters in the game when it comes to cracking defenses and landing hits against turtles, if not the single scariest. He is also one of the harder characters to use well, but the rewards are very obvious to those willing to practice with him for a long time. Unfortunately, he has to power up several times per round. His true strength lies in his Drink Pink state, which gives him several new tools as well as forcing the enemy to be extremely cautious, as basically any hit that Hwa lands can be turned into an extremely powerful combo.
Gameplay Notes
Pros
- Very high cost-effectiveness with single drive combos that deal nearly full-life damage.
- Highest damage non-HD combos in the entire game.
- Likely the single highest abare (ability to combo after a random hit or trade) in the game.
- Strong meterless combos.
- Very quick meter building.
- Can kill with just a 2 meter HD combo.
- Incredible offensive rush down game.
- Can juggle/punish extremely well.
- Very strong poke game both ground-based and air-to-air.
- Invulnerable 3/4 screen clearing shoryu which can lead to over 800 damage from anywhere at the cost of only 1 drive.
- Has an extremely high damage 0 frame grab DM.
- Cannot be zoned when drunk or has 1 meter.
- Strong anywhere in the stage, but even stronger in the corner.
- Can start extremely high damage combos from jump-ins, lows, frametraps, crossups, mid-range pokes and even trades.
Cons
- Needs to drink every 15 seconds, often two or more times per round.
- Can be zoned effectively when he has 0 meter and is not drunk.
- Jump-in normals have extremely low hitstun, meaning that they have to be done very late to combo after them, meaning Hwa is very susceptible to anti-air normals.
- Without at least 1 Drive Cancel his damage becomes merely average.
- Requires meter to power up with Drink Pink.
Normals
Standing
st. A: 25 damage, cancellable/chain-able, hits mid.
st. B: 30 damage, cancellable, hits mid.
st. C: 80 damage, cancellable, hits mid.
st. D: 80 damage, cannot be canceled, hits mid.
cl. C: 70 damage, cancellable, hits mid.
cl. D: 70 damage, cancellable, hits mid.
Crouching
cr. A: 25 damage, cancellable/chain-able, hits mid.
cr. B: 30 damage, chain-able, hits low.
cr. C: 70 damage, cancellable, hits mid.
cr. D: 80 damage, cancellable, hits low.
Jumping
j. A: 45 (40) damage, cancellable, hits overhead.
j. B: 45 (40) damage, hits overhead.
j. C: 72 (70) damage, cancellable, hits overhead.
j. D: 70 (68) damage, cannot be canceled, hits overhead.
Blowback Attack
CD: 75 damage, cancellable, hits mid.
j. CD: 90 (80) damage, cancellable, hits mid.
GCCD: 10 damage, cannot be canceled, hits mid.
Throw
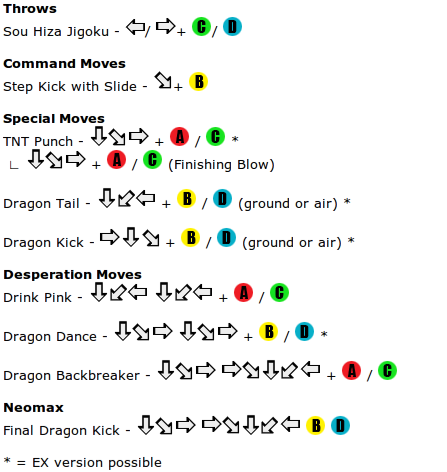
Sou Hiza Jigoku = (b/f+C/D)
- Can be broken
- Hit Detection: Throw
- Damage: 30 x 2, 48
Command Moves
Sliding = (df+B)
- Cancellable
- Hit Detection: Low
- Damage: 40
Special Moves
TNT Punch = (qcf+P)
(EX) = qcf+AC
- Drive- / Super-Cancellable
- Hit Detection: High
- A Damage: 20 x 3; C Damage: 20 x 6; EX Damage: 20 x 3, 30, 50 (Finishing Blow is automatic)
∟Finish (qcf+P)
- Drive- / Super-Cancellable
- Hit Detection: High
- Damage: 20, 40
Dragon Tail = (qcb+K) ground/air. Drink Pink state adds 1 hit to aerial opponents, allowing it to be looped 3 or 4 times anywhere.
(EX) = qcb+BD ground/air. Ground version invulnerable to projectiles and gives hard knockdown.
- Drive-Cancellable
- Hit Detection: High
- (Ground) B Damage: 50; D Damage: 50 x 4 (50 x 3); EX Damage: 50 x 4
- (Air) B Damage: 50; D Damage: 70; EX Damage: 90 x 2
Dragon Kick = (dp+K) - B goes up, D goes straight. B version has invulnerability during startup always. D version has invulnerability during startup during Drink Pink state.
(EX) = dp+BD - Can be cancelled into itself 2 extra times at no additional cost by pressing any direction with B or D. Has ultimate juggle. Has no invulnerability, even during Drink Pink state.
- Drive-Cancellable
- Hit Detection: High
- B damage: 70; D Damage: 70 x 2; EX Damage: 90, 35 x 2
Air Dragon Kick = (dp+K) in air - B goes down, D goes straight. Never has any invulnerability.
(EX) = dp+BD in air
- Drive-Cancellable
- Hit Detection: High
- Damage: 70; EX Damage: 35 x 3
Desperation Moves
Drink Pink = (qcbx2+P) - 10% Damage increase, and extra hit during Dragon Backbreaker DM. Adds an extra hit to both B and D Dragon Tail against aerial opponents. 15 second duration. Invulnerability at startup of drink animation.
- No Damage
Dragon Dance = (qcfx2+K)
(EX) = qcfx2+BD - final hit is 90 damage no matter what, ignoring all damage scaling.
- Hit Detection: High
- Damage: 0, 10 x 9, 20 x 2, 40 x 2; EX Damage: 0, 10 x 9, 20 x 6, 90
Dragon Backbreaker = (qcf hcb+P) - A version is 0 frames, C version is slower but invulnerable and travels halfscreen.
- MAX Cancellable (while in Drink Pink state)
- Hit Detection: Throw
- Damage: 50, 200 (50, 230, 63 during Drink Pink status)
Neomax
Final Dragon Kick = (qcf hcb+BD)
- Hit Detection: High
- Damage: 450 (40, 40 x 8)
Combos
No Stock, No Drive Gauge -
cr. B, st. B, df+B, dp+D
st. C, df+B, dp+D
st. D, df+B, dp+D
st. C, qcf+P qcf+P
No Stock, 1+ Drive Gauge -
cr. B, st. B, df+B, dp+D, (DC) qcb+K
st. C, df+B, dp+D, (DC) qcb+K
st. D, df+B, dp+D, (DC) qcb+K
j.C, j.qcb+B, st.C, df+B, dp+D (DC) j.qcb+B, dp+D - 468 damage
1 Stock, No Drive Gauge -
cr. B, st. B, df+B, qcf hcb+P
st. C, df+B, qcf hcb+P
st. D, df+B, qcf hcb+P
j.D, st.C, df.B, qcf hcb+A
j.CD, dp+BD, f+D, f+D - 235 damage
- does not require counter-hit
j.D, (air) qcb+B, st.C, df.B, qcf,hcb+A - 428 damage
corner only: j.C, j.qcb+B, st.C, df.B, qcf+AC, qcb+B, qcf+A, dp+B - 410 damage
2 Stock, 0 Drive Gauge -
j.C, j.qcb+B, st.C, df+B, qcf+AC, qcb+B, qcf+A, qcfx2+B/D - 516 damage
1 Stock, 1+ Drive Gauge -
cr. B, st. B, df+B, dp+D, (DC) qcb+B, qcfx2+K
st. C, df+B, dp+D, (DC) qcb+B, qcfx2+K
st. D, df+B, dp+D, (DC) qcb+B, qcfx2+K
j. D, (air)dp+B, dp+B (DC) qcb+D, *delay* dp+D, qcfx2+K = 537 damage [1]
- corner only, damage with EX super = 603
j. D, (air)qcb+B, st. C, dp+B (DC) qcb+d, *delay* dp+D, qcfx2+K = 570 damage [2]
- corner only, damage with EX super = 632
j. D, st. C, dp+D, (DC) qcb+B, qcfx2+K = 483 damage [3]
- Good Cross-Up Combo, works anywhere, pushes to the corner (or very close depending on where done), damage with Ex Super = 553 damage
j. D, st. C, df+B, dp+D (DC) qcb+B, qcfx2+K = 506 dmg [4]
- Good Cross-Up Combo, works anywhere, pushes to the corner (or very close depending on where done), damage with Ex Super = 572 damage
Combos when DRUNK
1 Stock (to drink), 1+ Drive Gauge -
j. C, j.qcb+B, cl. C, df+B, dp+D, (DC) j.qcb+D, qcb+D, qcb+B, qcb+B, qcb+B, qcfx2+B/D - 792 damage
- corner only and Hwa builds over 1 meter back during the combo. Can swap qcfx2+B/D at the end for EXDM if desired [5]
j. C, j.qcb+B, cl. C, df+B, dp+D, (DC) j.qcb+B, qcb+B, qcb+B, qcb+B, qcfx2+B/D - 726 damage
- works anywhere and Hwa builds over 1 meter back during the combo. Can swap qcfx2+B/D at the end for EXDM if desired. [6]
j. C, j.qcb+B, cl. C, d/f+B, dp+D (DC) j.qcb+D, qcb+D, qcb+B, qcb+B, qcb+B, dp+B (DC) j.qcb+D, (wait) qcb+D, qcb+B, qcb+B, qcb+B, dp+B (stun), qcbx2+A/C, j. C, j.qcb+B, cl. C, df+B, qcf+AC, qcb+D, qcb+B, qcfx2+BD - 1030 damage
- note: meter and drive gets built up in the combo [7]
dp+D, [DC] qcb+D, qcb+D, qcb+Bx3, dp+B, [DC] qcb+D, qcb+D, qcb+Bx3, qcfx2+BD - 855 damage
- works near the corner, starts from invulnerable shoryu, builds 2.2 meter during combo.
2 Stock, No Drive Gauge -
j.C, j.qcb+B, c.C, d/f+B, qcf+AC, qcb+B, qcb+B, qcb+B, qcfx2+B/D - 629 damage
- works anywhere, Hwa builds over 1 meter back during combo. Can swap qcfx2+B/D at the end for EXDM if desired. [8]
2 Stock, 1+ Drive Gauge -
cr.B, cr.B, s.B, df+B, dp+D, (DC) qcb+B, qcb+B, qcb+B, qcb+B, qcfx2+BD - 664 damage
- starts low, easy to confirm, works anywhere
dp+D, [DC] qcb+B, qcb+B, qcb+B, qcb+B, qcf+A, qcfx2+BD - 665 damage
- works anywhere, starts from invulnerable shoryu.
j. C, j.qcb+B, cl. C, df+B, dp+D, (DC) qcb+B, dp+D, link qcfx2+BD - 669 damage
- works anywhere. [10]
cr.B, cr.B, s.B, d/f+B, dp+D, [DC] qcb+D, qcb+D, qcb+B, qcb+B, qcb+B, qcf+A, qcfx2+BD - 706 damage
- starts low, also super easy to confirm, corner only [11]
HD Combos
(1) st. C, df+B, [HD] st. C, df+B, dp+D (2), [HDC in air] dp+D, (corner) [HDC] qcb+D, [dp+D (1), (HDC in air) dp+K, (HDC) qcb+D]×2, qcfx2+BD
(2) st. D, df+B, [HD] st. C, df+B, dp+D (2), [HDC in air] dp+D, (corner) [HDC] qcb+D, [dp+D (1), (HDC in air) dp+K, (HDC) qcb+D]×2, qcfx2+BD
(3) cr. B, st. B, df+B, [HD] st. C, df+B, dp+D (2), [HDC in air] dp+D, (corner) [HDC] qcb+D, [dp+D (1), (HDC in air) dp+K, (HDC) qcb+D]×2, qcfx2+BD
(4) st. C, df+B, [HD] st. C, df+B, qcf hcb+P, (MC) qcf hcb+BD
(5) st. D, df+B, [HD] st. C, df+B, qcf hcb+P, (MC) qcf hcb+BD
(6) cr. B, st. B, df+B, [HD] st. C, df+B, qcf hcb+P, (MC) qcf hcb+BD
(7) (drunk) j.C, j.qcb+B, st.C, df+B, [HD] st.C, df+B, dp+D [HDC] j.qcb+D, qcb+D, dp+B [HDC] j.qcb+D, qcb+D, dp+B [HDC] j.qcb+D, qcb+D, qcf,hcb+BD - 1015 damage
Strategies
Far Range
Mid Range
Close Range
Cornered Opponent
Cornered
Links & References
Videos
Hwa Jai Master Class:
Hwa Jai Drunk Mode 1238 Damage 1 meter+80% Drive Combo:
Contributors
Discussion Threads
Discuss at Dream Cancel


