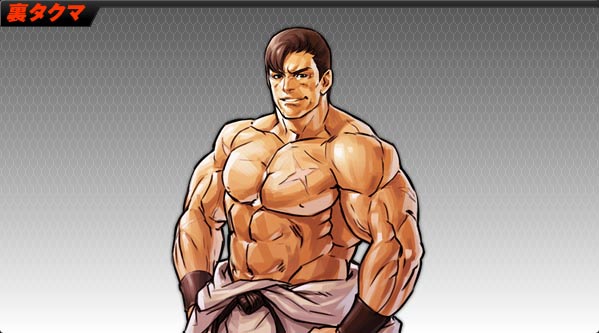
The King of Fighters 2002 UM/EX Takuma
Movelist
Normals
Close
- cl.A chains into lights
- cl.A/B/C are cancellable
Stand
- none of EX Takuma's stand normals are hit or whiff cancellable except st.C which is whiff cancellable in the first few frames of its startup.
- st.B hits very high, useful as quick meterless anti-air because Takuma is kind of lacking in this department.
- st.D is rather slow, not very useful.
Crouch
- cr.A/B chain into themselves and each other
- cr.A/B/C/D are cancellable
- cr.D is long and can be canceled into projectile on block for frametraps/blockstrings
Jumping
- j.B is EX Takuma's go to crossup tool
- j.D is another good crossup tool from specific ranges and setups
- j.CD is a fast long air-to-air and pressure tool. One of the best buttons for Takuma. Preemptively throwing this on hop/jump helps him stop jump-ins and work around his lack of DP.
Throws
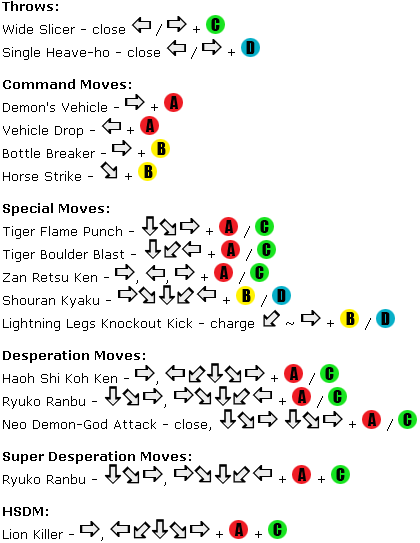
Wide Slicer - (b/f + C)
- grants hard knockdown
Single Heave-ho -( b/f + D)
- grants hard knockdown
Command Moves
Demon's Vehicle - (f + A)
- EX Takuma swings out his fist straight in front of himself, hitting it raw will grant a hard knockdown.
- Can combo into it from close and crouching normals during which on hit it becomes cancellable.
- With link timing you can do cl.A, cl.A>>f+A and still retain the hard knockdown property of the move.
- If you hit an aired opponent with the move it will slam them into a hard knockdown as well.
Vehicle Drop - (b + A)
- EX Takuma sends out a chop in front of himself, hits mid.
- Can't combo into it from anything
- Pushes him a little bit from the opponent which can make it a good spacing tool for certain pressure strings.
- It can nullify fireballs
Bottle Breaker - (f + B)
- Same as normal Takuma's, he throws out an elbow.
- Raw it hits overhead and you can combo straight into DM or max conversion.
Horse Strike - (df + B)
- EX Takuma punches straight toward the feet of his opponent, hits low and causes hard knockdown.
- Great for mixing in with a string to a standing opponent, but is atrociously unsafe on block.
Overall his command normals give him a lot of different angles to attack and pressure from.
Special Moves
Tiger Flame Punch - (qcf + A/C)
- ExTakuma's fireball move, a classic 2D spacing technique.
- C version travels faster.
- Both versions can be comboed into as combo finishers/pressure tools.
Tiger Boulder Blast - (qcb + A/C)
- EXTakuma thows out a parry then follows up with a heavy punch.
- The first part of the attack will absorb a single hit then he will continue the attack.
- Against predictable opponents could be used to counter meatys, but is very unsafe on block if overused.
- Causes soft knockdown.
- With correct timing you can use the parry animation to destroy fireballs.
- Hits mid.
- Super cancellable, but the follow up super won't connect depending on the spacing.
Zan Retsu Ken - (f, b, f + A/C)
- ExTakuma punches furiously, creating a wall of fist, when it connects it will suck the opponent in and launch them after 13 hits causing a soft knockdown.
- Can be comboed from a cl.C.
- On block the move will push EXTakuma back and the opponent will recover before the move even finishes making it very unsafe as a raw pressure tool.
- Htis mid.
Shouran Kyaku - (hcb + B/D)
- EXTakuma runs, grabbing the opponent and kicking them several times.
- Counts as an unblockable command throw.
- Causes hard knockdown.
- Cannot be comboed into.
- B version has slightly faster startup and goes only half screen. Grabs mid.
- D version will connect full screen from the run animation into the throw.
Lightning Legs Knockout Kick - (charge db~f + B/D)
- EXTakuma flies forward connecting with a kick.
- B version hits once and is about -1 on block.
- D version hits twice and launches the opponent into the air where you can land a juggle hit including his fireball supers.
- D version is about +1 on block.
- Both versions cause soft knockdown.
- Hits mid.
Desperation Moves
Haoh Shi Koh Ken - (f, hcf + A/C)
- great fireball super.
- A version is slower, both versions cause soft knockdown.
- Good punisher/combo ender.
Ryuko Ranbu - (qcf, hcb + A/C)
- EXTakuma dashes forward hitting the opponent with multiple attacks ending in a fireball.
- Unlike normal Takuma's it causes soft knockdown.
- Can be comboed into.
- Much like his run grab, A version goes a smaller distance in the screen to connect than the C version.
Neo Demon-God Attack - (close, qcf x 2 + A/C)
- This is a proximity unblockable super. Rather slow, can get interrupted after the flash fairly easily.
- It will connect at about the same range as his s.C normal.
- Causes soft knockdown.
Super Desperation Moves
Ryuko Ranbu - (qcf, hcb + AC)
- harder hitting version of EXTakuma's ranbu super does an addition hit and three fire balls at the end.
- Causes soft knockdown.
- Will go through fireballs for only the very first part of the animation.
HSDM
Lion Killer - (f, hcf + AC)
- EXTakuma's gi bursts open flexing all his muscles as he summons the destructive power of the tiger: a massively damaging full screen fireball that causes a soft knockdown. also an anywhere juggle.
Combos
- You can always end a cr.B chain with cr.A instead of the last cr.B. Having more range, cr.A is less likely to whiff than cr.B so ending chains with it is worth practicing.
- You can use f+B for an overhead max starter into any of the max routes.
0 Stock
- cr.Bx1~3, cr.A, f+A, qcf+C
- Simple combo from lows, no knockdown.
- cr.Bx1~4, cr.A, delayed f+A, df+B
- Most used meterless combo for Takuma. Easy confirm with hard knockdown. f+A has to be delayed to get late cancel on it and do a knockdown; one way to get this is to time it as if you were chaining another light button. df+B hits OTG.
- j.X, cl.C, f+A, qcf+C
- j.X, cl.C, delayed f+A, df+B
- Similar routes but started from j.X cl.C.
- j.X, cr.C, db~f+D, (f,b,f+P) / (f+A, df+B)
- A damaging route, but hard to land or confirm. Charging downback direction must be started in the air. f,b,f+P is an easier ender; f+A must be timed precisely to hit.
1 stock
- f+B, qcf,hcb+A / f,hcf+C
- Combo from an overhead to catch the opponent off guard. Useful, but no real way to confirm these, so it's a bit of a game. Getting it blocked may be punished.
- cr.Bx1~3, f+B, qcf,hcb+A / f,hcf+C
- cr.Bx1~4, cr.A, f+A, qcf,hcb+A / f,hcf+C
- j.X, cr.C, db~f+D, f,hcf+A
2 stocks
- (cl.C / cr.Bx1~3), f+A, BC, run, cl.C/cr.A, f+A, qcf,hcb+A / f,hcf+C
- cr.Bx3~4, cr.A, f+A, BC, run, cr.A, f+A, qcf,hcb+A / f,hcf+C
- (cl.C / cr.Bx1~3), f+A, BC, run, cl.C/cr.A, f+A, db~f+D, f,b,f+P (SC) f,hcf+A
( Slightly charge f,hcf+A when in dead corner )
- cr.Bx3~4, cr.A, f+A, BC, run, cr.A, f+A, db~f+D, f,b,f+P (SC) f,hcf+A
( Slightly charge f,hcf+A when in dead corner )
3 stocks
- Replace qcf,hcb+A by qcf,hcb+AC in 1 and 2 stocks combo
- Replace f,b,f+P (SC) f,hcf+A by f+A/st.CD, f,hcf+AC in 2 stocks combo
5 stocks
- 2 stocks combo ending with f,hcf+A then f,hcf+AC
( If you do this in dead corner, the opponent can tech the knockdown and block making it a waste of 3 bars. )
Videos
External Links
Check EX Takuma's frame data
Discuss at 02UM Discord server
Discuss at Dream Cancel


