Samurai Shodown VI
Introduction
Samurai Spirits Tenkaichi Kenkakuden (サムライスピリッツ 天下一剣客伝)
Samurai Shodown VI brings together every playable character from the Neo Geo MVS entries, with legacy characters who were missing from V Special making their return, and six subsystems to choose from inspired by each numbered entry, including a new system for VI itself. Additionally, four new characters have been introduced, resulting in a total of 40 characters in the arcade version. The console ports feature eight additional characters, four EX versions and three extra subsystems.
The arcade game is playable online via Flycast's Atomiswave emulation, using FightCade 2 as a front-end. For console versions, there's Dolphin.
Systems
Controls
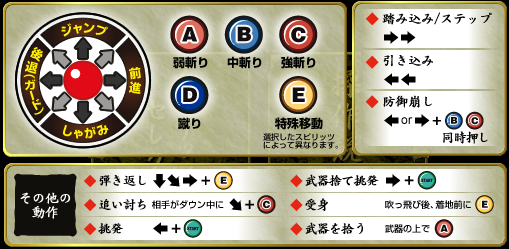
Buttons
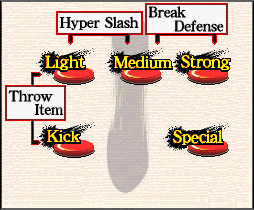
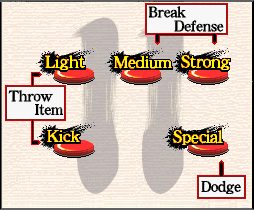
- A = Light Slash
- B = Medium Slash
- C = Heavy Slash
- D = Kick
- E = Special
- Start = Taunt
In line with existing wikis for III, V Special and 2019, motions will be represented in numpad notation.
Run/Step - 66
- Speed varies between characters. Some characters have step dashes instead of runs, and in turn these characters do not have a set of running normals.
Backdash - 44
- Distance and speed varies between characters. Every backdash can be cancelled into an air special, but not all characters have these.
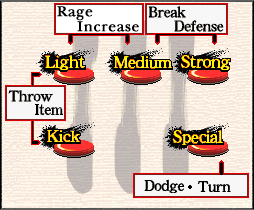
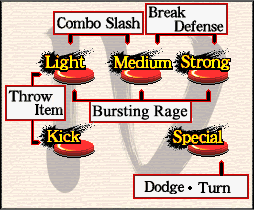
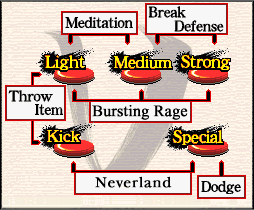
Break Defense - (4/6)BC
- A standard throw this time around with no extra nuance. You no longer have to tap a slash button to follow up with an attack, nor can you move freely after throwing while unarmed. New to VI is the ability to tech throws, using the same motion.
Pursuit - 3C
- There is only one type of pursuit in this game. Given how the roll system of previous games has been replaced with the new Ukemi system, pursuit followups are less guaranteed. Can only be performed when armed.
Short Ukemi - E during soft knockdown
- E must be timed near-perfectly as you hit the ground. This will result in your character tech rolling a short distance backwards. There is a brief period of recovery where your character is vulnerable to strikes.
Long Ukemi - 4E during soft knockdown
- Your character will tech roll over halfscreen away. There is no period of strike vulnerability and you are generally in a much safer position but depending on your character this could kill your momentum considerably.
Deflect/Weapon Catch - 236E
- Fast startup but not instant. Upon activation your character will attempt to deflect a mid-hitting, weapon-based normal attack from your opponent. The strength of the attack you parried will determine the amount of hitstun you get to work with for a punish, with deflected heavy slashes carrying the added bonus of disarming the opponent. When performed unarmed your character will recover much quicker from their pose. If any slash is successfully hit by a Weapon Catch the opponent will be disarmed and left in a hard knockdown state for an extended period of time, allowing you to retrieve your weapon. The size of its hit detection varies between characters.
Taunt - 4Start
- New addition to the series. Your character will perform a different taunt that doesn't involve disarming themselves. Can be performed unarmed.
Taunt Disarm - 6Start
- Standard taunt where your character will disarm themselves.
Weapon Pickup - A near weapon
- Your character will retrieve their weapon. This animation takes some time depending on the character, so you might want to make sure your opponent doesn't have an opportunity to punish you while trying to pick it up.
Throw Item - A+D
- If you have items turned on, Hikyaku will sometimes run past in the background and throw an item onto the stage. Your character will either toss or consume the item depending on its properties.
Mechanics
Rage
- Rage is the meter system of Samurai Shodown. When the meter is full your character will gain a damage boost and, unless you are using I Spirit, be able to perform WFTs until either your Rage runs out or your WFT hits. The exceptions are VI and 0, which do not have a timer but will fully drain upon performing a WFT whether it hits or not. Rage is built by taking damage in most Spirits, but in VI it is built by damaging your opponent. The console-only 0 allows you to build Rage either way. Your choice of Spirit will affect how much damage it takes for you to Rage and the amount of time you spend in Rage.
- The 'Amount to rage' in each character section is determined by how many n5As from V Haohmaru at 100% Weapon Gauge it will take for a character in IV Spirit to Rage. The 'Rage duration' notes how many seconds a character in IV Spirit will stay in Rage.
- The 'Rage retention' in each Spirit section is calculated by the amount of Rage accumulated from taking a 5C from V Haohmaru at 100% Weapon Gauge in each Spirit. The 'Rage duration' notes the modifier to the amount of time a character will stay in Rage, though not taking into account any changes to their defense modifier. All percentages given are in relation to IV Spirit, which has the greatest Rage retention and the longest Rage duration overall.
Backhit
- If you hit the opponent who is facing the wrong way your attack will gain extra frame advantage depending on its strength. Unlike in previous entries, the opponent will only remain backturned for the first hit, meaning the backhit infinites from older games which relied on a constant backturned state are now impossible.
Counter Hit
- If you hit the opponent during certain parts of their attacks you will score a counter hit. This does not increase your attack's damage but rather its hitstun, opening up combos which otherwise aren't possible with its regular frame advantage.
Deephit
- If your jumping attack connects on a crouching opponent or if it is a counter hit, the opponent will be put into a special animation where they are held in hitstun for longer but also reel back over a greater distance. This is usually how jC, 5C combos are made possible. You can no longer score deephits by simply hitting your jump-ins deep enough.
Hard Knockdown
- A property caused by certain moves in which opponents may not perform a tech roll while hitting the ground. This is usually caused by WFTs but certain special moves will result in hard knockdowns.
Soft Knockdown
- The most common type of knockdown. There is a small window to tech roll as you hit the ground.
Unarmed
- You are unarmed when you are not holding your weapon, for whatever reason. During this state you have access to your unarmed normals, kicks, movement options, Weapon Catch and certain special moves and WFTs, whether they are exclusive to the unarmed state (e.g. Wan-Fu's Spirit Blast Crush) or can simply be performed both armed and unarmed (e.g. Tam Tam's Gaboora Gaboora). Another downside to being unarmed is that some slash attacks will deal chip damage.
Weapon Clash
- Occasionally if your slash attack clashes with an opponent's and they are of the same strength you may initiate a Weapon Clash. This can only occur once a round. Whoever mashes the slash buttons the most will leave their opponent disarmed. There is no visible counter for button presses this time around.
Weapon Gauge
- Below your health bar is a separate gauge which manages damage scaling. It will drain as you attack and refill as you refrain from doing so. This is how heavy slashes can deal respectable damage at any point in the match while decent combos still experience damage scaling during and after their duration.
Spirits
I Spirit (怒 Rage)
Properties
- Your Weapon Gauge will increase from 100% to 180% when in Rage.
- Your Rage retention is ~73%.
- Your Rage duration is 70%.
- You do not have access to WFTs.
Hyper Slash - A+B
- A powerful, delayed strike which is essentially a suped-up heavy slash. During the attack your character can absorb one hit of anything (even WFTs) and continue the attack uninterrupted, although you still take all the damage. If you get hit by something with multiple hits then the Hyper Slash will stop. Performing this move will furthermore drain your entire Weapon Gauge.
II Spirit (真 True)
Properties
- Your Weapon Gauge will increase from 110% to 130% when in Rage.
- Your Rage retention is ~97%.
- Your Rage duration is 95%.
- When your Rage activates and you finish recovering from an attack, your character will be put into a fully invincible pose for a brief period of time. This can be cancelled into a throw, deflect/weapon catch, dashes, E-button movement (though you can only cancel into neutral hop with 4E), special moves, WFTs or secret moves. It cannot be cancelled into crouches, jumps, normals, command normals, taunts or toy transformations.
- Upon landing a WFT, the opponent's weapon will break.
Roll - 1/3E
- Your character will roll a set distance forward or backward. There is a brief period during the roll where you are fully invincible, but afterwards you will be able to take strike damage or be thrown. You will maintain a low profile, however. There is a brief period in every character's roll where it can be special cancelled, which is particularly useful for characters with command grabs or fast zoning tools.
Lie down - 2E
- Your character will lie down for a brief period of time. They maintain a low profile and are immune to throws by the first frame.
Neutral hop - 4E (E on its own will usually work)
- Your character will hop in place for a brief period of time. They maintain a high profile and are immune to throws by the first frame.
Toy Transformation
- Every character receives a new taunt reminiscent of the toy transformations in Samurai Shodown II. The input is different for each character.
Secret Move
- A powerful move which can be only performed once per round. Unlike in VI Spirit, the input is different for each character.
III Spirit (斬 Behead)
Properties
- Your Weapon Gauge will increase from 100% to 120% when in Rage.
- Your Rage retention is ~79%.
- Your Rage duration is 80%.
- When your health is in the orange region, starting from 10%, you will remain in Rage without it depleting. This gives you a constant damage boost and unlimited access to WFTs.
- Rage does not carry over between rounds.
Dodge - E
- Your character dodges in place. You are invulnerable to strikes but you can still be thrown.
Sway - 6E near opponent
- Your character swerves around the opponent, switching sides.
Air defense - jE
- Essentially an air parry, which means you can fall into an opponent's anti-air safely and punish them but you still have to time it, moreover it requires more commitment than simply holding back in the air.
Rage increase - [A+B]
- Your character can charge in place to increase their Rage meter. Charging will build exponentially more meter the longer you hold the buttons down. When attempting to perform this while your character is in Rage they will simply pause for a few frames then stop.
IV Spirit (天 Heaven)
Properties
- Your Weapon Gauge will increase from 90% to 110% when in Rage, and up to 120% during Rage Explosion.
- Your Rage retention is 100%.
- Your Rage duration is 100%.
Dodge - E
- Your character dodges in place. You are invulnerable to strikes but you can still be thrown.
Sway - 6E near opponent
- Your character swerves around the opponent, switching sides.
Continuous Slash - A+B
- Continuous Slash I - ... AAA
- Continuous Slash II - ... BBC
- Continuous Slash III - ... CCD
- Continuous Slash IV - ... AABBCCC
- The low Weapon Gauge percentages are there to compensate for the potential damage output you get with Continuous Slash. CS1 and CS3 are simple dial-a-combos, but the end of CS2 is always special cancellable whether it be on the ground or in the air. Some characters' CS4 have a segment or two which is special cancellable but this is not universal.
- Upon completion of CS4 you gain a chunk of Rage. This is most noticeable for characters with small Rage propensities.
Rage Explosion - ABC
- This is a safe burst which can only be performed on the ground. This means it can only break combos if you haven't been launched. Upon Rage Explosion you will stay in a buffed version of Rage for an amount of time which is determined by the amount of health you have lost that round beforehand, with a maximum time of ten seconds (this is not affected by your character's usual Rage duration). If you have 40% life remaining for instance then you will spend six seconds in Rage Explosion. If you burst at full life then you will have exactly zero seconds to work with.
- Once either the timer for Rage Explosion runs out, you land a WFT or you use Fatal Flash, your meter is gone for the rest of the match.
Fatal Flash - ... ABC
- During Rage Explosion you have access to a fast, fullscreen-travelling punish tool. Damage is determined by how much time you have remaining as represented by the current state of your meter. On block you quickly bounce back to fullscreen, which makes it safe but can potentially ruin your momentum.
V Spirit (零 Null)
Properties
- Your Weapon Gauge will increase from 100% to 120% when in Rage, and up to 150% during Rage Explosion.
- Your Rage retention is ~94%.
- Your Rage duration is 60%.
- You take slightly more damage in this Spirit.
Roll - 1/3E
- Your character will roll a set distance forward or backward. There is a brief period during the roll where you are fully invincible, but afterwards you will be able to take strike damage or be thrown. You will maintain a low profile, however. There is a brief period in every character's roll where it can be special cancelled, which is particularly useful for characters with command grabs or fast zoning tools.
Lie down - 2E
- Your character will lie down for a brief period of time. They maintain a low profile and are immune to throws by the first frame.
Neutral hop - 4E
- Your character will hop in place for a brief period of time. They maintain a high profile and are immune to throws by the first frame.
Forward hop - 6E
- Your character will hop forward. They maintain a high profile, though not as high as for neutral hops, and are immune to throws by the first frame.
Meditation - [A+B]
- Instead of letting your Rage accumulate, you can instead choose to meditate it away if you have a moment. This will expand the blue bar in your health gauge.
Rage Explosion - ABC
- This is a safe burst which can only be performed on the ground. This means it can only break combos if you haven't been launched. Upon Rage Explosion you will stay in a buffed version of Rage for seven seconds.
- Once either the timer for Rage Explosion runs out or you land a WFT, your meter is gone for the rest of the match.
State of Nothingness - D+E
- If your health is in the blue area, starting at 10% but increasing as you meditate, and you're on a losing round, you can activate State of Nothingness where time for the opponent slows to a crawl, allowing you to not only punish the opponent easily but lead into big combos thanks to the extended hitstun you get from slowed time. Characters with launchers are particularly effective in V Spirit as these types of combos are immune to Rage Explosion. The more you meditate, the more time you have to work with, though at minimum the game treats it as if you have meditated at least up to 33% which makes plenty of short, damaging combos in State of Nothingness feasible.
Fatal Flash - ... ABC
- During State of Nothingness you have access to a fast, fullscreen-travelling punish tool. Damage is determined by how much you have meditated. On block you quickly bounce back to fullscreen, which makes it safe but can potentially ruin your momentum.
VI Spirit (剣 Sword)
Properties
- Your Weapon Gauge will increase from 95% to 100% when in Rage.
- Your Rage duration is unlimited until you perform a WFT or use Hyper Guard.
- You build Rage by hitting the opponent rather than getting hit yourself.
- You take slightly more damage in this Spirit.
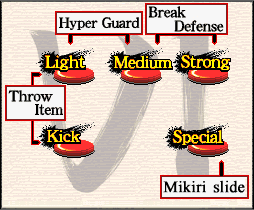
Hyper Dodge/Mikiri
- Backward step - 5D
- Lie down - 2D
- Neutral hop - 4/6D
- These are special dodges which will parry different areas for attacks. Upon performing these dodges your character will perform an evasive manuever while a blue afterimage lurks briefly behind you. If your opponent hits this afterimage, you will recover quickly while the rest of their attack whiffs. Additionally you will also gain a small amount of meter. If the Mikiri fails and they hit you then you will take regular damage. You'll have to figure out which Mikiri to use for each situation.
Hyper Guard - A+B
- You may only perform this move when your meter is flashing white, as it will cost you a portion of your meter. This is a parry which covers your entire body and pushes the opponent a great distance back from you as they continue to whiff the rest of their attack. This is mainly used for getting the opponent off of you rather than for punishes.
Secret Move - 236BC
- A powerful move which can be only performed once per round and if your health is in the green portion of your life bar, which starts off at 16% but will increase by a small amount depending on the strength of attack you parry. The green portion will reset back to 16% at the end of a round.
0 Spirit (魔 Demon)
Note: Selectable on console only. Used by Demon Gaoh in the arcade version.
Properties
- Your Weapon Gauge will increase from 100% to 110% when in Rage.
- Your Rage retention is ~87%.
- Your Rage duration is unlimited until you perform a WFT.
- You build Rage by either hitting the opponent or getting hit.
- Similar to VI, you will retain your Rage until you use your WFT.
- Upon landing a WFT, the opponent's weapon will break.
Roll - E
- Your character will roll a set distance forward or backward. There is a brief period during the roll where you are fully invincible, but afterwards you will be able to take strike damage or be thrown. You will maintain a low profile, however. There is a brief period in every character's roll where it can be special cancelled, which is particularly useful for characters with command grabs or fast zoning tools.
VII Spirit (獣 Beast)
Note: Console only.
Properties
- Your Weapon Gauge will increase from 100% to 120% when in Rage.
- Your Rage retention is ~64%.
- Your Rage duration is 100%.
- You take noticeably more damage in this Spirit.
- This is the only Spirit which Poppy, Shikuru & Mamahaha, Pak Pak and Chample can select.
- You are unable to block.
S.C.S Samurai Combination System - 5A > 2A > 5D > 2D > 6D > 3D > 5B > 2B > 5C > 2C
- Universal magic series which opens up for new possible combos. An example combo with Haohmaru is n5A n2A 6D n5B n5C. Projectile-esque attacks such as Basara's far B and C normals can not be chained from.
- If an opponent is hit by a heavy attack while in hitstun from a previous heavy attack they will fall into a soft knockdown, a rule which applies to S.C.S as well. 5D n5C with Basara will cause a knockdown but 5D n5B n5C will not.
Play Possum - hold 1, 2 or 3 while knocked down
- Delayed wakeup. If you hold down for as long as possible (five seconds) you will restore a bit of life, but this will be interrupted if the opponent lands a pursuit and you will rise immediately.
Hyper Dodge/Mikiri
- Backward step - 5D
- Lie down - 2D
- Neutral hop - 4/6D
- This is what you have to work with instead of blocking. Unlike in VI Spirit you will not gain any meter from a successful Mikiri.
VIII Spirit (祭 Festival)
Note: Console only.
Properties
- Your Weapon Gauge will increase from 100% to 110% when in Rage.
- Your Rage retention is ~86%.
- Your Rage duration is 100%.
- You take slightly more damage in this Spirit.
Spirits Edit Mode
- There are eight slots for custom systems, in which up to 50 points may be spent on different system mechanics (the exception is forfeiting your ability to block, which will earn you an extra eight points). Below are the selectable subsystems unique to VIII Spirit:
Continue Cancel
- You can perform consecutive Mikiri moves.
Opening Action
- You are allowed to walk and crouch before the round starts.
Samurai Drive
- Certain special moves are super cancellable. This includes both WFTs and Secret Moves. Additionally some Secret Moves are super cancellable into WFT, but can not be cancelled into themselves. An example combo with Haohmaru is 421S 341236421BC (II)/236BC (VI) 236AB.
Tier Lists
- S: Mina, Shizumaru, Amakusa, Iroha
- A: Galford, Mizuki, Cham Cham, Kazuki, Sogetsu, Gaoh, Zankuro, Haohmaru, Ukyo
- B: Rera, Sieger, Hanzo, Yumeji, Rasetsumaru, Enja, Gen-An
- C: Andrew, Ocha-Maro, Yunfei, Kusaregedo, Sankuro, Suija, Nicotine, Rimururu, Gaira, Basara
- D: Charlotte, Sugoroku, Kyoshiro, Jubei
- E: Genjuro, Earthquake, Nakoruru, Wan-Fu, Yoshitora
Tier List #1
- S: Mina, Shizumaru, Amakusa, Iroha
- A: Kazuki, Sogetsu, Cham Cham, Gaoh, Zankuro, Haohmaru, Ukyo, Galford, Mizuki
- B: Hanzo, Yumeji, Rasetsumaru, Enja, Gen-An, Rera, Sieger
- C: Suija, Nicotine, Sankuro, Basara, Andrew, Ocha-Maro, Gaira
- D: Rimururu, Sugoroku, Jubei, Yunfei, Tam Tam, Kyoshiro, Charlotte
- E: Genjuro, Yoshitora, Wan-Fu, Kusaregedo, Earthquake, Nakoruru
Tier List #2
- SS: Mina
- S: Amakusa, Iroha, Shizumaru, Kazuki
- A: Galford, Mizuki, Cham Cham, Sogetsu, Gaoh, Zankuro, Haohmaru, Ukyo, Yunfei, Enja
- B: Rera, Sieger, Hanzo, Yumeji, Rasetsumaru, Andrew, Rimururu
- C: Ocha-Maro, Kusaregedo, Gen-An, Sankuro, Suija, Nicotine, Gaira, Basara
- D: Charlotte, Sugoroku, Kyoshiro, Jubei
- E: Genjuro, Earthquake, Nakoruru, Tam Tam, Wan-Fu, Yoshitora
- S: Mina (V), Kazuki (IV), Amakusa (VI), Iroha (IV)
- A: Shizumaru (V), Sogetsu (IV), Ukyo (IV), Mizuki (VI), Andrew (V), Gen-An (V)
- B: Rasetsumaru (VI), Rera (V), Galford (IV/V), Rimururu (IV), Gaoh (IV), Wan-Fu (IV/VI), Sieger (IV)
- C: Suija (V), Nicotine (IV/V), Sankuro (IV), Enja (I), Ocha-Maro (III), Zankuro (V), Yunfei (V), Hanzo (IV/VI), Nakoruru (V), Charlotte (I/IV)
- D: Gaira (III), Jubei (V), Yumeji (IV/V), Basara (V), Genjuro (IV), Yoshitora (IV/V), Sugoroku (IV)
- E: Tam Tam (V), Kusaregedo (III), Earthquake (IV/VI), Haohmaru (V/VI), Cham Cham (IV/V), Kyoshiro (IV)
- Notes: Characters are listed in their best grooves.
- Purple Nakoruru shares spot with Nakoruru, being a palette swap.
- Not included are all the console-exclusive characters (Rasetsu Galford, Kim Ung Che, Poppy, Shikuru & Mamahaha, Paku Paku, Champuru)
- Rasetsu Galford is broken so he would be in God Tier obviously; and the animals seems to be all weak since they're unable to block.
Characters
First Row
Second Row
Third Row
Fourth Row
Fifth Row
Sixth Row
Seventh Row
- Nakoruru (Bust) (Console only)
- Amakusa
- Mizuki
- Zankuro
- Gaoh
Eighth Row
- Galford (Bust) (Console only)
- Poppy (Console only)
- Shikuru & Mamahaha (Console only)
- Pak Pak (Console only)
- Chample (Console only)
- Kim Ung Che (Console only)
Hidden Row
- Kuroko (Console only)
