Difference between revisions of "The King of Fighters '98 UMFE/Clark Still"
Jump to navigation
Jump to search
(wrote descriptions for clarks normals) |
(added descriptions for Clarks throws and special moves) |
||
| Line 11: | Line 11: | ||
== Normal Moves == | == Normal Moves == | ||
'''Close''' | '''Close''' | ||
| Line 41: | Line 39: | ||
*st. CD: has a large hitbox that essentially creates a wall in front of clark but it has quite a lot of startup, good for whiff canceling | *st. CD: has a large hitbox that essentially creates a wall in front of clark but it has quite a lot of startup, good for whiff canceling | ||
*j. CD: is your main jumpin normal for pressure. | *j. CD: is your main jumpin normal for pressure. | ||
== Command Normals == | |||
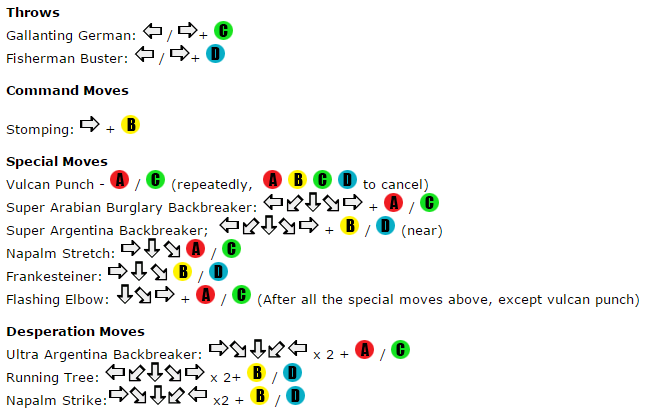
''' Stomping ''' f+B | |||
* mostly used after a meaty cl.C, though it won't combo into anything else after this due to the pushback of it. Cancelable. | |||
== Throws == | == Throws == | ||
'''Gallanting German''': b/f + C (close) | '''Gallanting German''': b/f + C (close) | ||
* regular throw, techable. Clark goes behind the opponent and flings them behind him sending them full screen away with a soft knockdown. | |||
'''Fisherman Buster''': b/f + D (close) | '''Fisherman Buster''': b/f + D (close) | ||
* regular throw, techable. Clark picks the opponent up and suplexes them behind him causing a backturned hard knockdown. | |||
'''Death Lake Driver''': b/d/f + C/D (in the air) | '''Death Lake Driver''': b/d/f + C/D (in the air) | ||
* air grab, not techable. Clark grabs the opponent in the air and throws them down to the ground in front of him causing a hard knockdown. | |||
== Special Moves == | == Special Moves == | ||
'''Vulcan Punch''': press A/C repeatedly | '''Vulcan Punch''': press A/C repeatedly (can be cancelled by pressing ABCD simultaneously) | ||
* Clark delivers a series of quick punches angled upwards. the punches has 2 alternating hitboxes, one angled upwards and one angled in front of clark. | |||
* this move isn't great as an anti air as it can be hard to time and even the upwards hitbox isn't that great. | |||
* can be made safer on block or whiff by cancelling it with ABCD | |||
* can be cancelled into dp+A on hit for a combo. | |||
'''Flashing Elbow''': qcf+ A/C after ($) moves | '''Flashing Elbow''': qcf+ A/C after ($) moves | ||
* a followup to a variety of Clarks specials. | |||
* adds extra damage and still gives him time to pressure and run oki so it's safe to always go for this followup. | |||
'''Super Arabian Burglary Backbreaker''': hcf + A ($) | '''Super Arabian Burglary Backbreaker''': hcf + A ($) | ||
* a running command grab that puts the opponent behind clark with a hard knockdown. | |||
* has a nice amount of low invul when Clark has started running. | |||
* can be followed up with qcf+P for added damage and oki. | |||
'''Rolling Cradle''': hcf + C ($) | '''Rolling Cradle''': hcf + C ($) | ||
* a running grab where Clark rolls around with the opponent backwards. | |||
* Clark runs further with this version compared to the C version and this version has more corner carry as well. | |||
* has a nice amount of low invul when clark has started running. | |||
* can be followed up with qcf+P for added damage and oki. | |||
* causes a face down hard knockdown giving Clark more time to put pressure on the opponent on their wakeup compared to hcf+A. | |||
'''Super Argentine Backbreaker''': hcf + B/D (close) ($) | '''Super Argentine Backbreaker''': hcf + B/D (close) ($) | ||
* Clarks 1 frame command grab and a staple of his mixup and combo game. | |||
* causes a hard knockdown. | |||
'''Napalm Stretch''': dp + A/C ($) | '''Napalm Stretch''': dp + A/C ($) | ||
* an anti air grab designed to catch people trying to jump out of his grounded command grabs. | |||
* not great as an anti air since Clark will get hit out of it if the opponent has an attack out. | |||
* causes a hard knockdown. | |||
'''Frankensteiner''': dp + B/D (close) ($) | '''Frankensteiner''': dp + B/D (close) ($) | ||
* a slower command grab with full invul until the grab comes out. | |||
* great move to catch people trying to wake up with a button or reversal as your invul frames will allow you to go through those. | |||
* staple move of his mixup game as this will catch people trying to beat some of your other options like cr.B or a meaty. | |||
* causes a backturned hard knockdown. | |||
== Desperation Moves == | == Desperation Moves == | ||
Revision as of 12:29, 30 March 2021


Introduction
Normal Moves
Close
- cl. A: same as st.A
- cl. B: Clarks fastest normal at 2f so useful when you're up close and need the speed. Chainable. Cancelable.
- cl. C: very fast at 3f and his main heavy combo normal. Good for meaties due to its long active frames. Cancelable.
- cl. D: has low invul from startup until after the active frames so it can be good for blowing up lows on a read.
Stand
- st. A: has nice priority and a decent amount of active frames so it's good for stopping hops. Chainable. Cancelable.
- st. B: a decent poke as it has good speed and priority.
- st. C: reaches really far but whiffs on most crouchers.
- st. D: hits low crouchers, has better priority than st.C and is faster but it doesn't reach as far.
Crouch
- cr. A: is pretty standard. could be good for tick throws if you cancel dp+K out of it. Cancelable. Chainable.
- cr. B: your main low combo starter and a core part of his mixup and pressure game. Not cancelable but you can link his 1f command grab afterwards for a combo. Chainable.
- cr. C: has less range than his standing pokes but has a lot of active frames so it's good for meaties and comes out fairly fast, it also recovers really fast. can be used as a shorter ranged poke.
- cr. D: Fast sweep with decent range
Jump
- j. A: your main jumpin button for combos, comes out quite fast.
- j. B: a fast air to air normal, good for hitting characters straight in front of Clark.
- j. C: his most damaging air to air normal so good for max damage punishes but outclassed in other situations.
- j. D: great air to air normal that hits above clark. especially good when done with a short hop.
Blowback
- st. CD: has a large hitbox that essentially creates a wall in front of clark but it has quite a lot of startup, good for whiff canceling
- j. CD: is your main jumpin normal for pressure.
Command Normals
Stomping f+B
- mostly used after a meaty cl.C, though it won't combo into anything else after this due to the pushback of it. Cancelable.
Throws
Gallanting German: b/f + C (close)
- regular throw, techable. Clark goes behind the opponent and flings them behind him sending them full screen away with a soft knockdown.
Fisherman Buster: b/f + D (close)
- regular throw, techable. Clark picks the opponent up and suplexes them behind him causing a backturned hard knockdown.
Death Lake Driver: b/d/f + C/D (in the air)
- air grab, not techable. Clark grabs the opponent in the air and throws them down to the ground in front of him causing a hard knockdown.
Special Moves
Vulcan Punch: press A/C repeatedly (can be cancelled by pressing ABCD simultaneously)
- Clark delivers a series of quick punches angled upwards. the punches has 2 alternating hitboxes, one angled upwards and one angled in front of clark.
- this move isn't great as an anti air as it can be hard to time and even the upwards hitbox isn't that great.
- can be made safer on block or whiff by cancelling it with ABCD
- can be cancelled into dp+A on hit for a combo.
Flashing Elbow: qcf+ A/C after ($) moves
- a followup to a variety of Clarks specials.
- adds extra damage and still gives him time to pressure and run oki so it's safe to always go for this followup.
Super Arabian Burglary Backbreaker: hcf + A ($)
- a running command grab that puts the opponent behind clark with a hard knockdown.
- has a nice amount of low invul when Clark has started running.
- can be followed up with qcf+P for added damage and oki.
Rolling Cradle: hcf + C ($)
- a running grab where Clark rolls around with the opponent backwards.
- Clark runs further with this version compared to the C version and this version has more corner carry as well.
- has a nice amount of low invul when clark has started running.
- can be followed up with qcf+P for added damage and oki.
- causes a face down hard knockdown giving Clark more time to put pressure on the opponent on their wakeup compared to hcf+A.
Super Argentine Backbreaker: hcf + B/D (close) ($)
- Clarks 1 frame command grab and a staple of his mixup and combo game.
- causes a hard knockdown.
Napalm Stretch: dp + A/C ($)
- an anti air grab designed to catch people trying to jump out of his grounded command grabs.
- not great as an anti air since Clark will get hit out of it if the opponent has an attack out.
- causes a hard knockdown.
Frankensteiner: dp + B/D (close) ($)
- a slower command grab with full invul until the grab comes out.
- great move to catch people trying to wake up with a button or reversal as your invul frames will allow you to go through those.
- staple move of his mixup game as this will catch people trying to beat some of your other options like cr.B or a meaty.
- causes a backturned hard knockdown.
Desperation Moves
Ultra Argentine Backbreaker: hcb,hcb + A/C (close)
Running Three: hcf,hcf + B/D
Napalm Strike: hcb,hcb + B/D