Difference between revisions of "The King of Fighters '98 UMFE/Yuri Sakazaki"
Armoredrobot (talk | contribs) m (→Command Moves) |
Armoredrobot (talk | contribs) m |
||
| Line 98: | Line 98: | ||
* nj.D: A great jumping side kick that is active for a while, which is great to be used defensively. | * nj.D: A great jumping side kick that is active for a while, which is great to be used defensively. | ||
'''CD Normals''' | |||
* st.CD: Cancelable on hit, block, and whiff. | |||
* j.CD: Good for hop pressure due to its long blockstun. | |||
== Throws == | == Throws == | ||
Revision as of 00:25, 24 January 2022
Introduction
Yuri is a poking- and rushdown-focused character with a large bag of tools to deal with every situation. In neutral, she has access to a lot of strong options: on the ground she has some great normal pokes, a dash punch, a stationary projectile, and a projectile DM, and in the air she has access to more good normals, an air throw, and an air projectile. On offense, Yuri has access to an overhead, a good low confirm, and multiple crossup options. On defense, she has access to a good DP and some fast long-range light normals for mashing out of pressure.
Changes to Previous Versions
98 to 98UM
- st.C is now cancelable
- st.D now has fewer startup frames
- j.C now has a smaller hitbox vertically
- nj.C's hitbox has been moved up to align with the hurtbox
- j.A is now cancelable
Specials:
- j.qcf+K has been added
- qcb+P now has a bigger hitbox vertically, and no longer whiffs on small or tiny crouchers
Supers:
- qcf,hcb+BD now has the same startup as the regular version
- dp+C now launches on the first hit, so it won't drop mid-combo
- f,hcf+A now has faster startup, and can now combo from heavies
- f,hcf+C now travels faster
98UM to 98UMFE
Specials:
- qcf+K now has less recovery on landing, and less frame advantage on block (patch notes do not specify whether it's the air or ground version)
- qcb+D now does less damage, but also has less recovery; you can link a st.A or cr.A on hit afterward
Normal Moves
Close
- cl.A: Same as st.A.
- cl.B: A cancelable standing low. Has a very short activation range, so if the spacing isn't correct, st.B might come out.
- cl.C: Kinda funny-looking uppercut. Hits quite high, so it can be good to stop jump-outs. Has a notable dead zone where it activates but whiffs. Unsafe on block. Cancelable.
- cl.D: Knee to the midsection. Safer and more useful than cl.C. Cancelable.
Standing
- st.A: A decent-ranged quick jab. Good for poking, mashing out of pressure, and stopping hops. Safe on block. Chainable and cancelable.
- st.B: A quick high kick that's good for stopping hops and controlling space.
- st.C: A fast hook punch. Good for ending blockstrings with because of the pushback, or to catch mashers in the corner. Cancelable, but hard to combo out of due to pushback.
- st.D: Good for zoning and anti-airing, but has bad recovery. Has a lot of pushback on block, but can still be punished by moves that go very far very fast.
Crouching
- cr.A: Fast, safe on block, and overall very similar to st.A. Chainable and cancelable.
- cr.B: Standard low combo starter. Has good recovery. Chainable.
- cr.C: An uppercut with fast startup that's good for anti-airing normal jumps. Cancelable.
- cr.D: Sweep with bad recovery but decent range. Cancelable.
Jumping
- j.A: Good for jump-ins, but has poor damage.
- nj.A: Short-ranged elbow hook.
- j.B: Good for jump-ins, and also has a big enough hitbox to be used as an instant overhead from a backward jump.
- nj.B: A low, close-ranged kick.
- j.C: A strong hammerfist. It can be performed fairly deep and is good for jumping in and starting combos with.
- nj.C: A double-palmed attack that has limited range.
- j.D: It can crossup, it hits deep, and it has a decent-sized hitbox.
- nj.D: A great jumping side kick that is active for a while, which is great to be used defensively.
CD Normals
- st.CD: Cancelable on hit, block, and whiff.
- j.CD: Good for hop pressure due to its long blockstun.
Throws
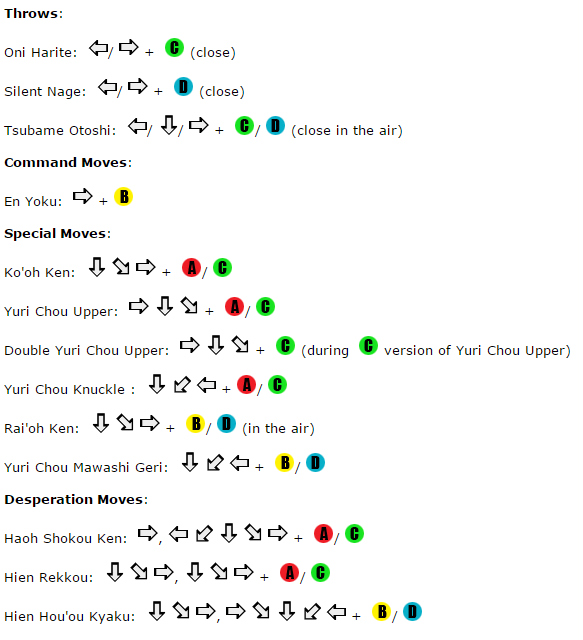
Oni Harite: b/f+C (close)
- Regular throw, techable. Yuri grabs the opponent and slaps them, sending them fullscreen with a soft knockdown.
Silent Nage: b/f+D (close)
- Regular throw, techable. Yuri grabs the opponent, throws herself backward, and kicks them to the other side of the screen with a soft knockdown. Switches sides.
Tsubame Otoshi: b/d/f+C/D (close, in air)
- Air throw, not techable. Yuri grabs the opponent in the air and dives with them into the ground, causing them to slide to the other end of the screen with a hard knockdown.
Command Moves
En Yoku: f+B
- When done raw, it's a good overhead. When canceled into, it's a mid-hitting move that cannot be canceled out of (doesn't work as combo filler).
Special Moves
Ko'oh Ken: qcf + A/C
- Yuri throws out an energy wave in front of her hand.
- the A version goes about half screen and the C version about 3/4s of the screen,
- a good longer distance poke that recovers quicker than regular fireballs.
- can also be used to counter others fireballs since it is a projectile.
- it does have a fair amount of recovery still so if it whiffs it can be whiff punished by long range moves.
- it's also quite susceptible to being jumped over or rolled through.
Yuri Chou Upper: dp + A/C
- Yuris dragon punch move.
- the A version is an invincible reversal that hits once.
- the C version is not a reversal but it hits more times and deals more damage, and it also has a followup.
- the C version is one of Yuris staple combo tools as it will combo from both lights and heavies due to it travelling forwards a lot and coming out fairly quickly.
- Both A and C versions are very punishable on block.
Double Yuri Chou Upper: dp + C (during C version of Yuri Chou Upper)
- a followup to Yuris C dp where she does a second one.
- unlike followups to a lot of other moves this one will come out whether the move hit or not.
- if the opponent blocks your dp this move may make them mess up their punish and it's worth going for since if they block your dp you will probably be punished either way.
Yuri Chou Knuckle: qcb + A/C
- Yuri does a burn knuckle like move where she travels forwards fast with a punch.
- can be used as a longer poke that also lets Yuri get closer to the opponent.
- the A version is very safe on block even at close ranges, the opponent needs a 1f command grab to consistently punish it point blank so outside of that range it is very safe.
- does have a fair amount of startup so can be hit before the punch comes out.
- the C version is slightly less safe but travels a larger distance.
Rai'oh Ken: qcf + B/D (in the air)
- Yuri jumps up into the air and comes down with a close ranged fireball.
- both B and D versions are plus on block making this a good tool to use in a blockstring to reset pressure wtih.
- D version can be thrown out as a long range approach tool as it's plus on block.
- the move does have long startup so can be hit before the fireball comes out.
Rai'oh Ken: j.qcf + B/D (in the air)
- Yuri creates a short ranged fireball in the air.
- this move does not change Yuris aerial trajectory or momentum in the air.
- can be blocked either standing or crouching.
- both B and D versions are more or less minus on block depending on how close to the ground they hit.
- can be good for preemptive air to airs since she gets a hard knockdown on hit.
- The best trick about this move is that if you do it while jumping over the opponent Yuri will turn around mid air and hit it as a crossup.
- can not be done during backdash or a step dash.
Yuri Chou Mawashi Geri: qcb + B/D
- Yuri does a spinning kick that makes her travel forward.
- B version travels a shorter distance and has more recovery making it mostly worse than the D version, and like the D version it doesn't hit very well on crouchers either.
- D version is good to use in combos when the opponent is standing as it's plus enough on hit that it lets her link a normal and combo afterwards.
- D version is fairly safe on block if blocked standing but if the opponent crouches there will be gaps that they can use to punish the move.
- this is a move best used for combos only as she has better tools for moving forward or using in blockstrings.
Desperation Moves
Haoh Shokou Ken: f,hcf + A/C
- A version of Hao Sho Ko Ken is slower than C version, but can be comboed. Though the timing is a little tricky so the other two DMs will be better options for combos.
- MAX version mirrors the C version but is bigger and does more damage.
Hien Rekkou: qcf,qcf + A/C
- has invul frames so can be used as a reversal.
- A version consistently combos from 2 lights or heavies making it a good option for a combo super
- C version only connects from heavies limiting it's use.
- Max version functions the same as the C version but deals more damage so it's also pretty limited.
Hien Hou'ou Kyaku: qcf,hcb + B/D
- a ranbu super.
- can combo from lights so this super gives her some 3 hit confirms into super.
- can also be used as a kinda fast longer range punish
Combos
0 Stock
Low
- cr.Bx1~2, cr.A/st.A, dp+C > dp+C
Anywhere
- (jump-in), cl.C, qcf+P
- (jump-in), cl.C, dp+C > dp+C
Very Close
- cl.C, qcb+D, st.A, dp+C > dp+C
- -Note: this cannot be done out of a jump-in, and it only works on standing opponents
1 Stock
Low
- cr.Bx1~2, cr.A/st.A, qcf,hcb+K
- -Note: this can be done as cr.Bx1~2, qcf+A, hcb+K for an easier cancel
Anywhere
- (jump-in), cl.C/cr.C, qcf,hcb+K
Quick Max
Low
- cr.Bx2, ABC, cl.D, f,hcf+P
- -Note: hold forward during quick max activation to ensure you're close enough for cl.D
- cr.B, st.A, ABC, st.C, qcf,hcb+K
Overhead
- f+B, ABC, st.A, dp+C > dp+C
Very Close
- cl.C, qcb+D, st.A, ABC, st.C, qcf,hcb+K
- -Note: this cannot be done from a normal jumpin but it does work from a crossup jumpin. It only works on standing opponents
3 Stock/2 Stock Max/Low Health 1 Stock Extra Mode
- In any 1 stock combo, replace qcf,hcb+K with qcf,hcb+BD or f,hcf+P with f,hcf+AC


